Simple Approach to (Without) SVM Algorithm (Create Hyperplane Base Regression Of Closest Pair)
Hi All Student, we apologize for the delay in posting “Sentiment Analysis Document Using Support Vector Machines (SVMs) With Linier & Polynomial Kernel Without Matlab ToolBox” . But it’s okey. 😀
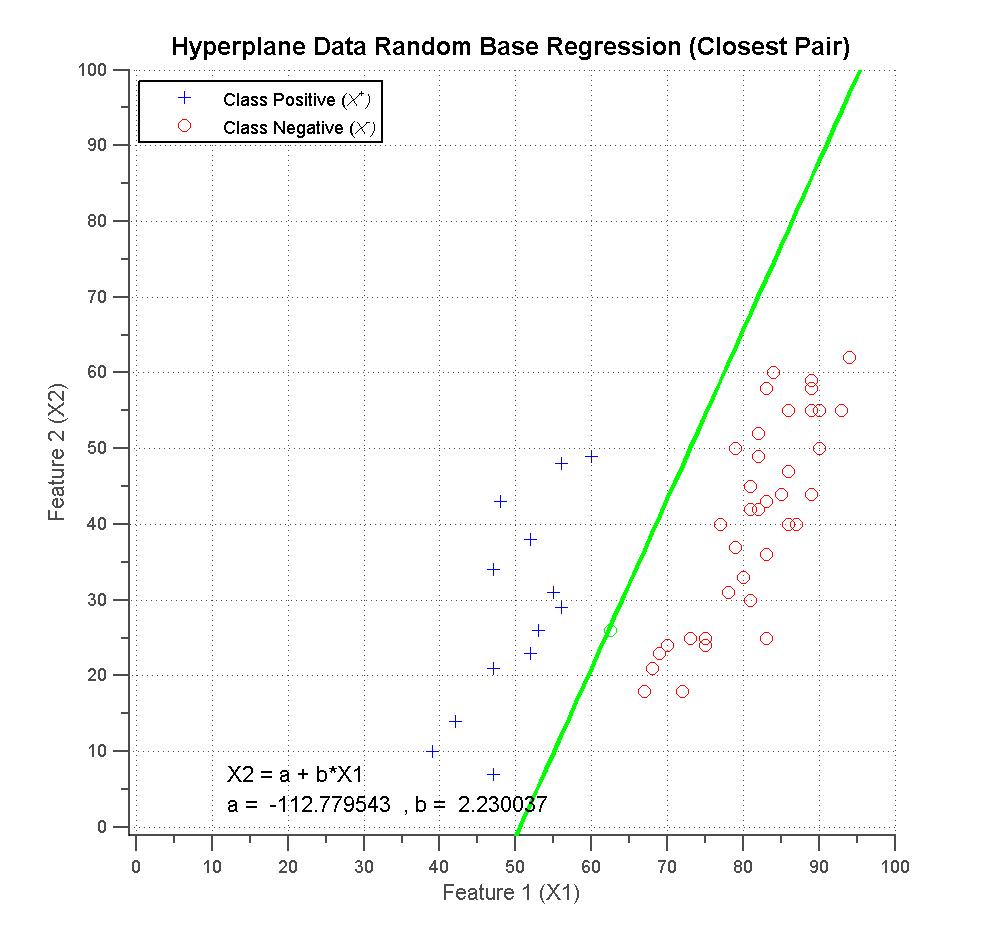
In this week we will provide an overview of a technique which it’s think is a very simple approach to be implemented in making comparisons with the results hyperplane formed of Support Vector Machine (SVM) on linear data to separate the two classes (binary classification), based Linear Regression method on nearest points (Closest Pair) is formed of two points between classes to take its midpoint. Obviously this method is very vulnerable to errors in the formation of the hyperplane line, because they do not have a concept of Support Vector, in the sense that all points are considered all result of midpoint or it’s just take few of midpoint.
This is the linear regression formula (y = a + b*x) :

Tracking animation base Closest Pair :

Hyperplane_Data_Random_Base_Regression_Closest_Pair
View results part 1 :

Hyperplane Data Random Base Regression (Closest Pair)_1
View results part 2 :

Hyperplane Data Random Base Regression (Closest Pair)_2
View results part 3 :

Hyperplane Data Random Base Regression (Closest Pair)_3
View results part 4 :
Hyperplane Data Random Base Regression (Closest Pair)_4
You can download This Matlab Code All About “Simple_Approach_Hyperplane_Of_SVM_Base_Regression_Closest_Pair” at (Simple_Approach_Hyperplane_Of_SVM_Base_Regression_Closest_Pair.zip). Note : “After Download it, To Extract File (Simple_Approach_Hyperplane_Of_SVM_Base_Regression_Closest_Pair.zip), You must Rename Extension *.doc to *.zip” ![]()
To Running the program, double click Simple_Approach_Hyperplane_Of_SVM_Base_Regression_Closest_Pair.m file. Enjoy with matlab code, especially for your research.
Any Suggestions, Question and Other, Send to My Email : matlabfreecode@gmail.com
(CMIIW & PMIIW).
Deploy .m (Matlab) to .java and .jar (Java Application) On Windows OS [part 5]
In the fifth section coincides with 5 till 7 day before Eid and holiday period at home in my village until the 11th of August 2013 to connect silaturrahmi / kinship relations and longs to be with both parents and my siblings. Alhamdulillah, I feel very happy and peaceful can be meeting them. This seems similar to the story when I heard the song of “Michael Bublé – Let me go home”. hehe .. 🙂 , Okey all student and people in the world, now we will share how to run the file from the deploy results *.m to *.java using Eclipse (How to run all files *. Java in the folder “..\MyProject_Java_Application\src\myProject_Java_Application” and file *.ctf in folder “..\MyProject_Java_Application\src\classes\myProject_Java_Application” in Eclipse). We use Eclipse Indigo & Matlab 2009 and hope you can develop to recently version on both. 🙂 Let’s go the developer :
- Installs Eclipse, then run on your computer.

Installs Eclipse
- Set “Workspace” on the folder that we want. Then click “OK” button.

workspace-folder
- Display “Welcome” page in Eclipse.

Welcome page in Eclipse
- Click “File” and then click “New”, then click “Java Project”.

Click File and then click New then click Java Project
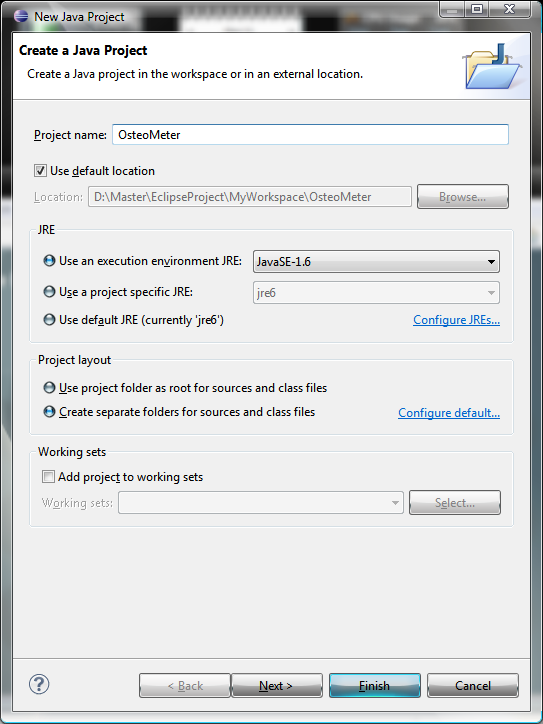
- Create a new project, for example with the name “OsteoMeter”, then click the “Finish” button.

Create a new project for example with the name OsteoMeter then click the Finish button
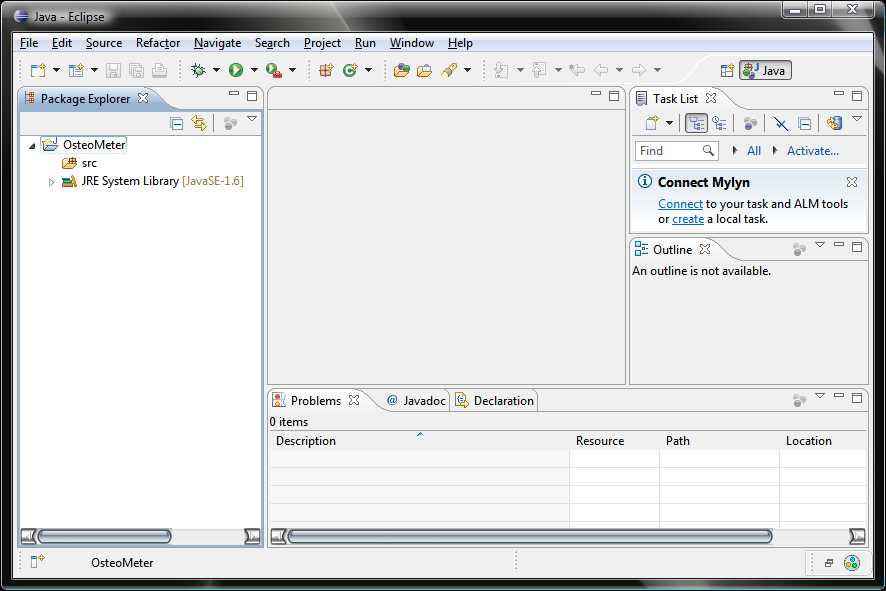
- Click the “Minimize” button on the “Welcome” page to see the Eclipse Project form of “OsteoMeter”.

Click the Minimize button on the Welcome page to see the Eclipse Project form of OsteoMeter
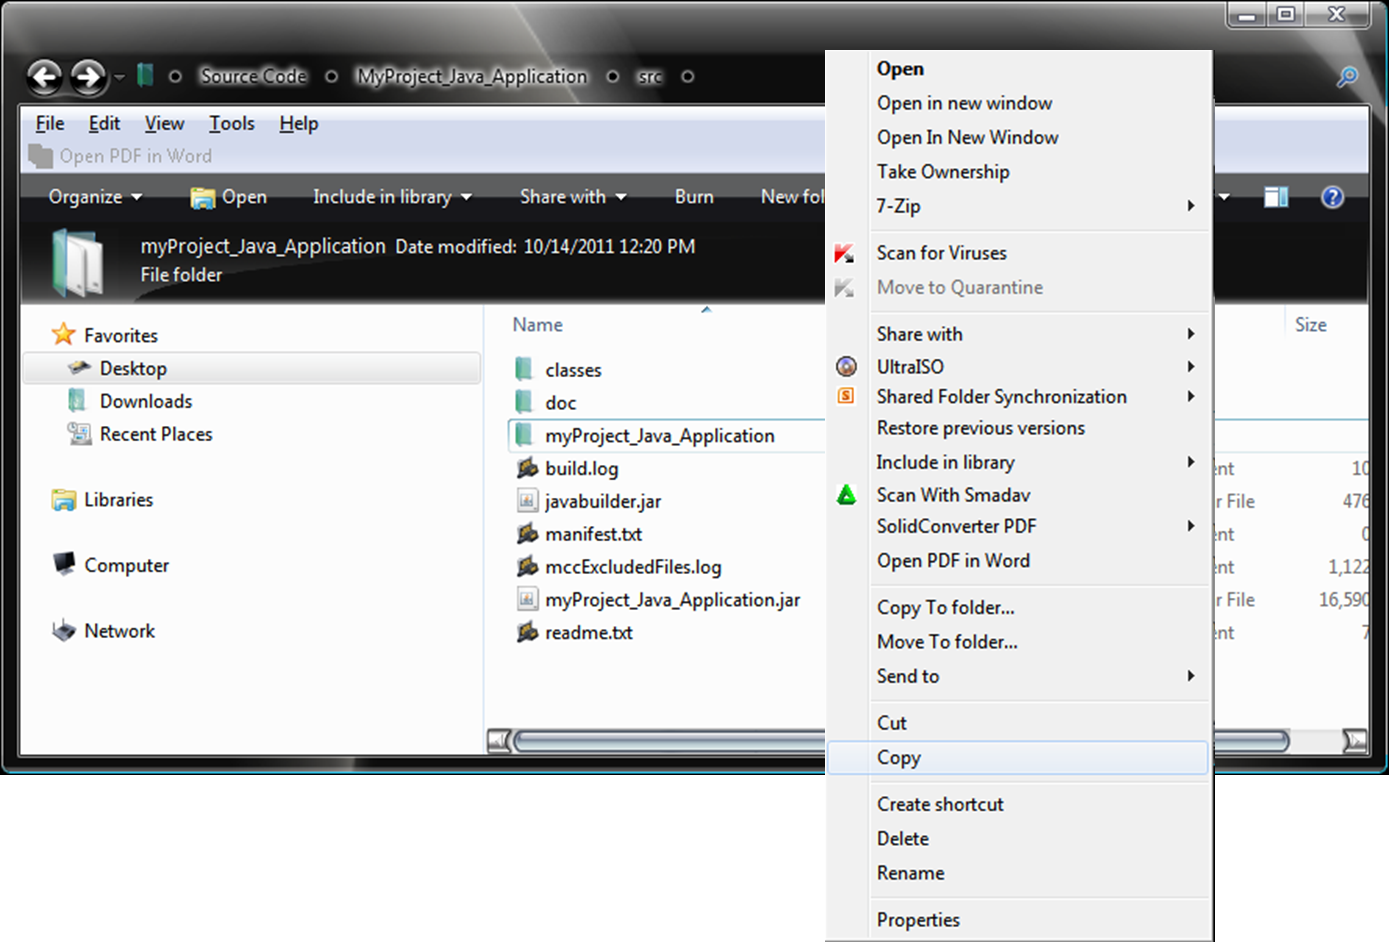
- Copy Folder “myProject_Java_Application” in folder “.. \ MyProject_Java_Application \ src”
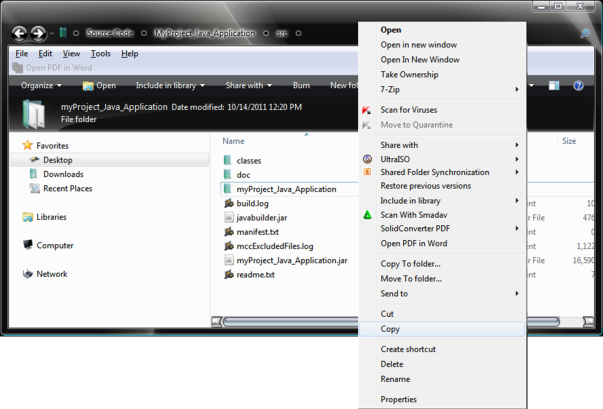
Copy Folder-myProject_Java_Application-in folder -MyProject_Java_Application-src
- Then Paste in the folder where we store the Eclipse Project “OsteoMeter”. For example in the folder “D: \ Master \ EclipseProject \ MyWorkspace \, then look for the folder” D: \ Master \ EclipseProject \ MyWorkspace \ OsteoMeter \ src “.

Then paste in folder-eclipse
- Display after the process of Paste is done.

Display after the process of Paste is done – eclipse
- Copy the file *. ctf in the folder “.. \ MyProject_Java_Application \ src \ classes \ myProject_Java_Application”
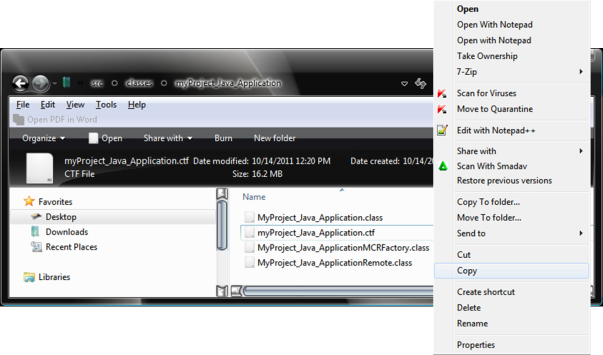
Copy the file-ctf in the folder-MyProject_Java_Application-src-classes-myProject_Java_Application
- Paste it in the folder “D: \ Master \ EclipseProject \ MyWorkspace \ OsteoMeter \ src \ myProject_Java_Application”.
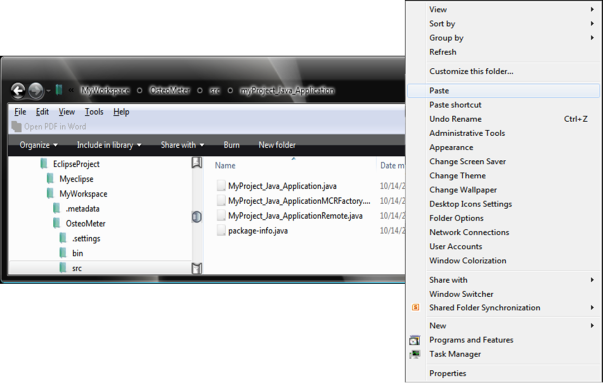
Paste it in the folder-D-Master-EclipseProject-MyWorkspace-OsteoMeter-src-myProject_Java_Application
- Display after the process of Paste is done.

Display after the process of Paste is done-eclipse-part2
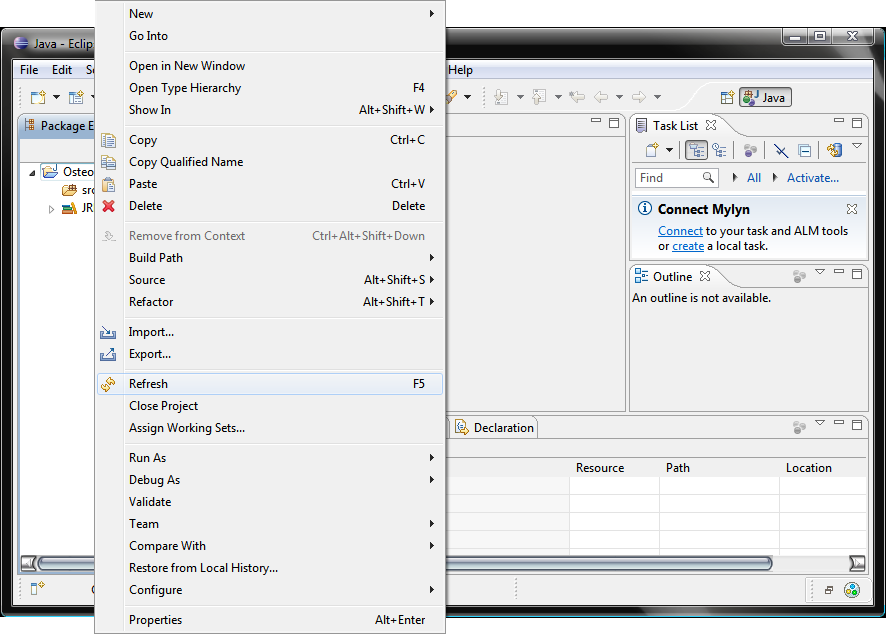
- Back to the Eclipse Project, right click on the Project “OsteoMeter”, then click “Refresh”.
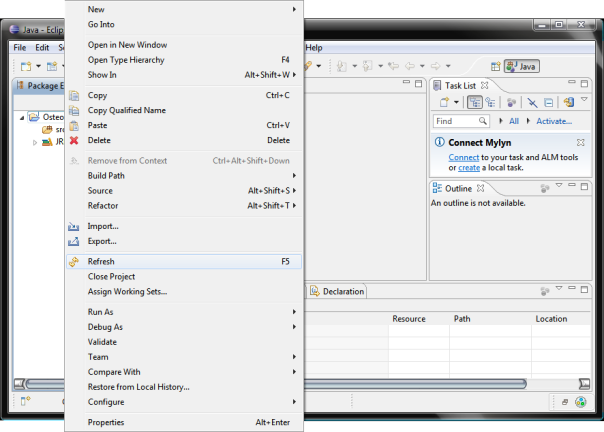
Back to the Eclipse Project-right click on the Project-OsteoMeter-then click-Refresh
- It will show all files “.java” and “.ctf” which has been incorporated and there is appear error.
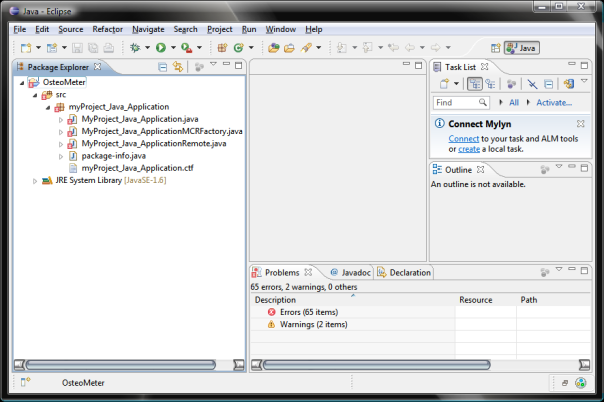
It will show all files java and ctf which has been incorporated and there is appear error
- Enter the library “javabuilder.jar” to eliminate the errors that are marked with red color on some files “.java” in the Eclipse Project.
- Right-click the Project “OsteoMeter”, then click “Build Path”, then click “Configure Build Path …”, then select the “Libraries” tab.

Right-click the Project OsteoMeter then click Build Path then click Configure Build Path then select the Libraries tab
- Click “Add External JARs…” button.

Click Add External JARs button
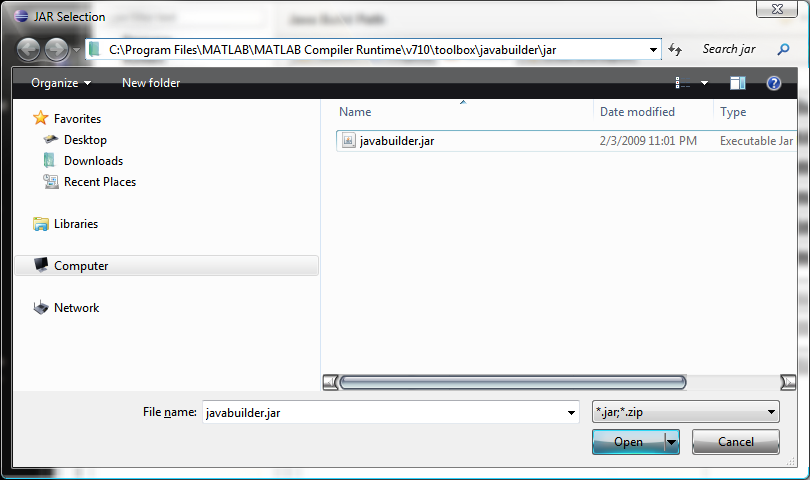
- Select the file “javabuilder.jar” then click “Open”.

Select the file javabuilder.jar then click Open – eclipse
- Click the “OK” button.
note : take library “javabuilder.jar” at “C:\Program Files\MATLAB\MATLAB Compiler Runtime\v710\toolbox\javabuilder\jar\javabuilder.jar”. this directory of javabuilder may be different from those in your computer. Because this directory of javabuilder accordance with the directory where we install file “MCRInstaller.exe”. So take this file javabuilder corresponds to that of in your computer.
- Right-click the Project “OsteoMeter”, then click “Build Path”, then click “Configure Build Path …”, then select the “Libraries” tab.
- Display Project File “OsteoMeter” which has been equipped library “javabuilder.jar”.
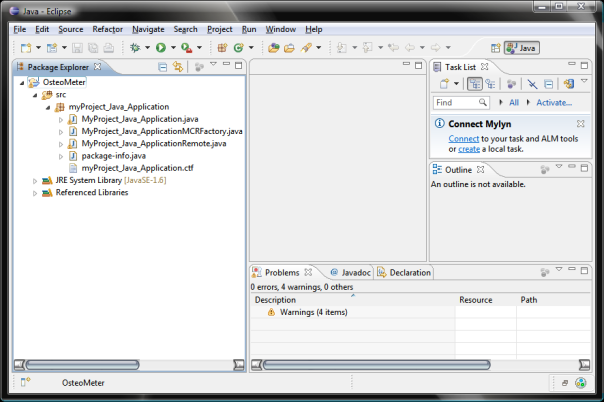
Display Project File OsteoMeter which has been equipped library javabuilder.jar
- Set “MyProject_Java_Application.java” as the Main-Class Project by right clicking “OsteoMeter”, then click “Run As”, then click “Run Configuration ..”.

Set MyProject_Java_Application.java as the Main-Class Project by right clicking OsteoMeter then click Run As then click Run Configuration
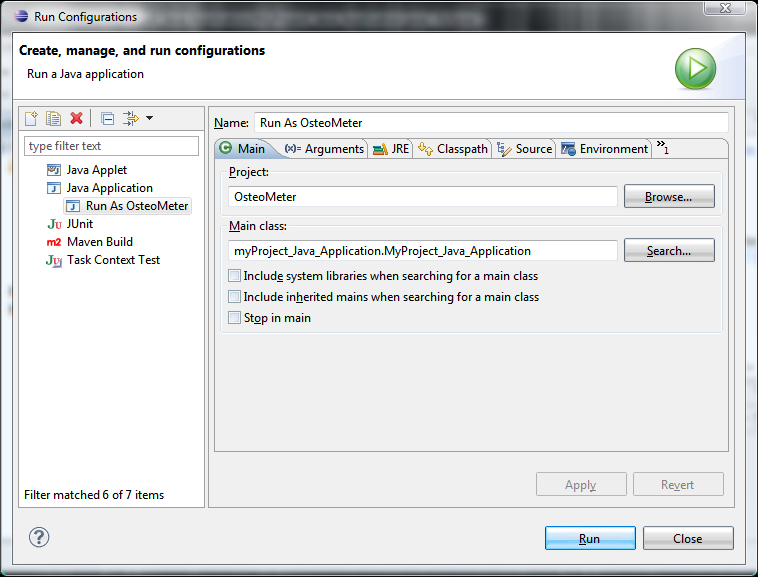
- Click the “Java Application”, then click the “New launch configuration” (
 ), eg “Name: Run As OsteoMeter”. Select Project by clicking the “Browse …”, eg “Project: OsteoMeter”, then click the “Search” in the “Main class:”.

New launch configuration – eclipse
- Select “MyProject_Java_Application” as the Main-Class, then click “OK”.

Select MyProject_Java_Application as the Main-Class then click OK
- Click the “Apply”, then click “Run”. Wait a few moments until the interface is appear, and it close automatically.

Click the Apply then click Run Wait a few moments until the interface is appear and it close automatically
- Click the “Java Application”, then click the “New launch configuration” (
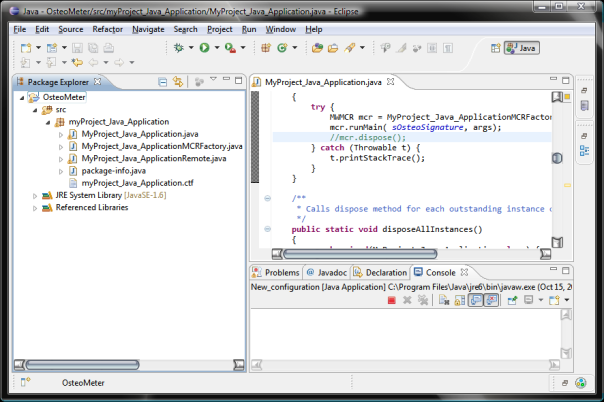
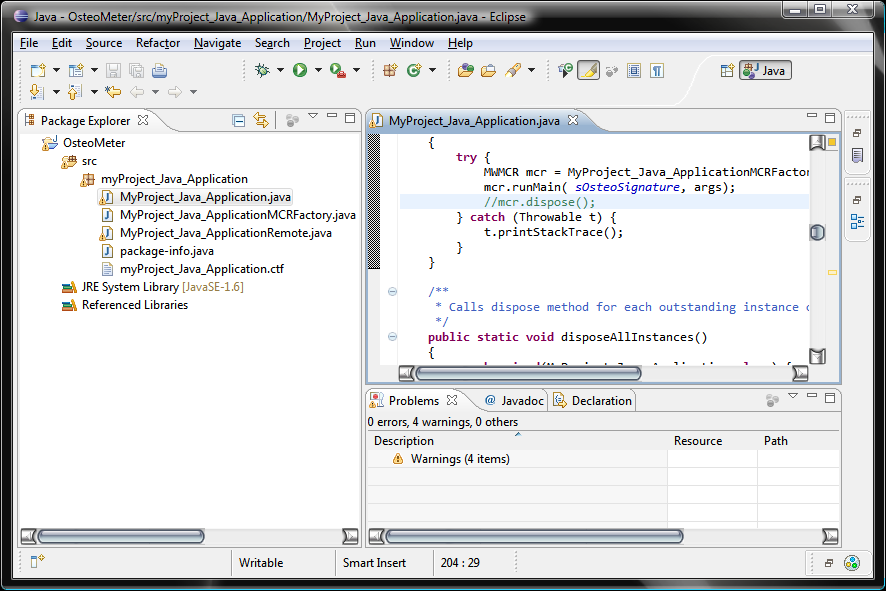
- Edit the file .java which is a Main-Class, the “MyProject_Java_Application.java”

Edit the file .java which is a Main-Class the MyProject_Java_Application.java – eclipse
Seek script “mcr.dispose();” by pressing the button “CTRL+F” then type with keyword “mcr.dispose();” then change become “//mcr.dispose();” then pressing save button.
- Project running process “OsteoMeter” doing by right-clicking Project “OsteoMeter”, then click “Run As”, then click (
 ).
).

process – run as java application – eclipse
- Select “MyProject_Java_Application”, then click “OK”.

Select MyProject_Java_Application then click OK
- The project “OsteoMeter” can be running with other way, by click the black arrow button that down direction.
 Then click “(
 )” that has been set as caller Main-Class in the previous section, so that the Form “Select Java Application” is used to select the file .java with manually way. It’s a Main-Class (file. java that first executed while running the process) doesn’t show up again.
 - Project “OsteoMeter” is being compiled. Wait a few seconds until the interfaces is appear.
Project OsteoMeter is being compiled Wait a few seconds until the interfaces is appear
- Display after Running result of deploy file *.m to *.java on Eclipse without Matlab.

Display after Running result of deploy file .m to .java on Eclipse without Matlab
note: if interface display the results of running only appears a few seconds (automatic exit). The solution is on the section “Edit file .java which is Main-Class”. Maybe you are not yet looking for a script “mcr.dispose();” by pressing “CTRL + F” and then type keyword “mcr.dispose();” then change it to “/ /mcr.dispose();” and press save button.
- Congratulations, you’ve been success to Running result of deploy file *.m to *.java on Eclipse without Matlab.
- Finish. 🙂


Deploy .m (Matlab) to .java and .jar (Java Application) On Windows OS [part 4]
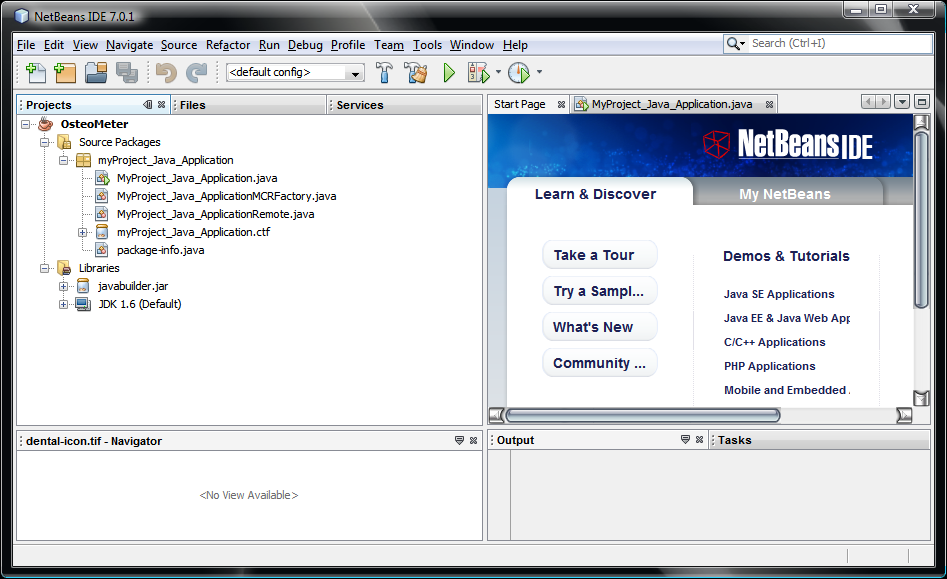
In the fourth section coincides with the month of Ramadan, we will share how to run the file from the deploy results *.m to *.java using Netbeans (How to run all files *. Java in the folder “..\MyProject_Java_Application\src\myProject_Java_Application” and file *.ctf in folder “..\MyProject_Java_Application\src\classes\myProject_Java_Application” in NetBeans). We use Netbeans IDE 7.0.1 & Matlab 2009 and hope you can develop to recently version on both. 🙂 Okey, Let’s go the developer :
- Installs Netbeans, then run on your computer.

Installs Netbean
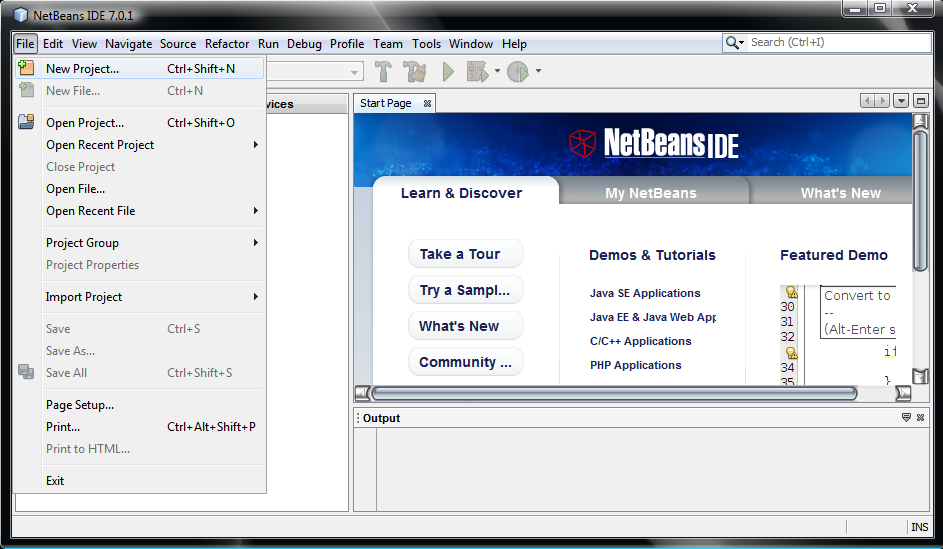
- Click “File”, then Click “New Project…”

Create New Project
- Choose “Categories” [Java] and “Projects” [Java Application], then click “ Next > ” button

Choose Categories
- Create new Project e.g. with name “OsteoMeter”, uncheck at “Create Main Class” and “Set as Main Project”, then click “Finish” button.

Project Name
- Copy Folder “myProject_Java_Application“ into Folder “..\MyProject_Java_Application\src”

Copy Folder myProject_Java_Application
- Then Paste into Folder where we save Project of NetBeans “OsteoMeter”. E.g at folder “D:\Master\NetBeansProject\”, so then seek folder “D:\Master\NetBeansProject \OsteoMeter\src”.

Paste at Folder where we save Project of NetBeans
- Display after Paste folder process is done.

Display after Paste process is done
- Copy file *.ctf at Folder “..\MyProject_Java_Application\src\classes\myProject_Java_Application”

Copy file .ctf at Folder
- Paste into Folder “D:\Master\NetBeansProject\OsteoMeter\src\myProject_Java_Application”.

Paste into Folder D_Master_NetBeansProject_OsteoMeter_src_myProject_Java_Application
- Display after Paste file *.ctf process is done.
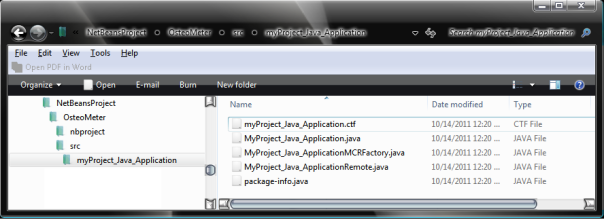
Display after Paste file .ctf process is done
- Back to NetBeans Project, display when all file “.java” and “.ctf” has been included. It’s will be seen there is an error.

Back to NetBeans Project
- Include library “javabuilder.jar” to eliminate errors marked in red on some files of “*.java” :
- Right click “Libraries”

Right click Libraries
- Click “JAR/Folder…”
Click JAR_Folder
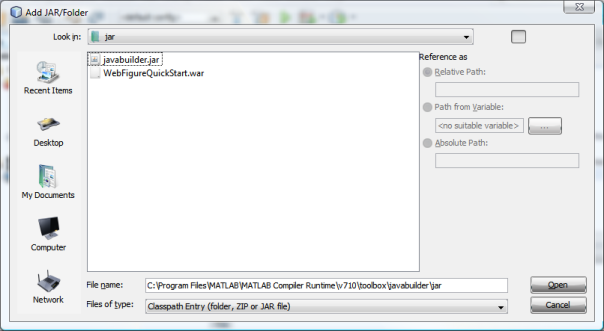
- Choose file “javabuilder.jar” then click “Open” button.
note : take library “javabuilder.jar” at “C:\Program Files\MATLAB\MATLAB Compiler Runtime\v710\toolbox\javabuilder\jar\javabuilder.jar”. this directory of javabuilder may be different from those in your computer. Because this directory of javabuilder accordance with the directory where we install file “MCRInstaller.exe”. So take this file javabuilder corresponds to that of in your computer.
- Right click “Libraries”
- Display File Project “OsteoMeter” that has been included library of “javabuilder.jar”.

Display File Project OsteoMeter
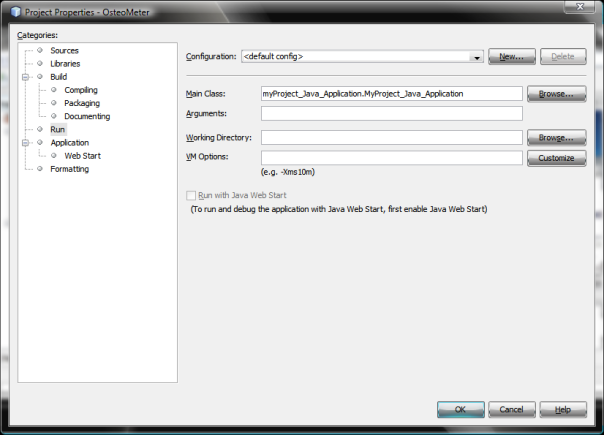
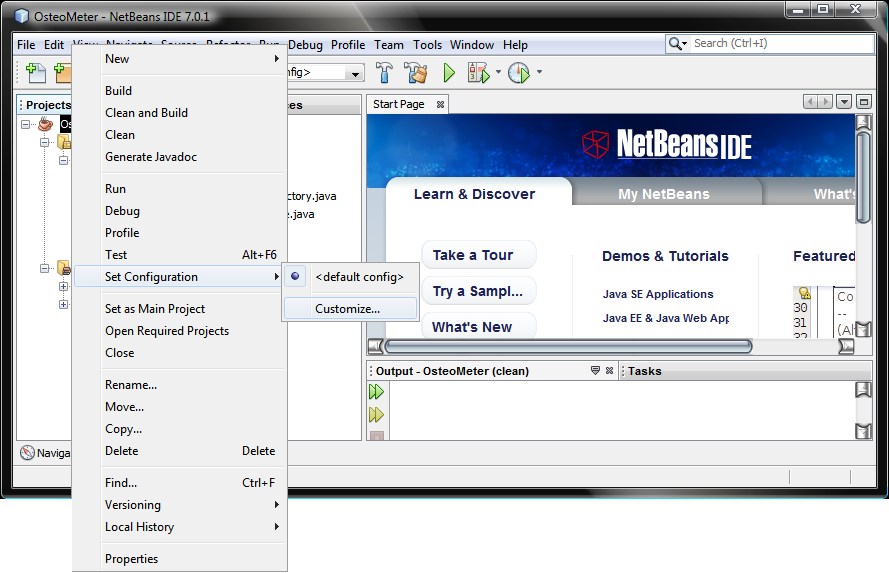
- Set “MyProject_Java_Application.java” as Main-Class, with do right click Project “OsteoMeter”, then select “Set Configuration”, then select “Customize…”

Set MyProject_Java_Application.java as Main-Class
- Click “Browse..” button at field “Main Class”. Then click “Select Main Class” button.

Click Browse.. button at field Main Class
- Then click “OK” button.
Then click OK button
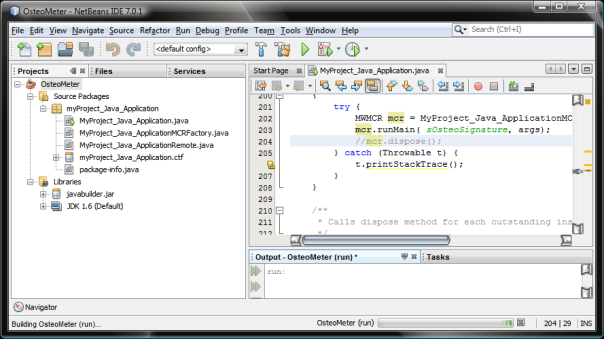
- Edit file .java which is Main-Class, namely “MyProject_Java_Application.java”

Edit file .java which is Main-Class
Seek script “mcr.dispose();” by pressing the button “CTRL+F” then type with keyword “mcr.dispose();” then change become “//mcr.dispose();” then pressing save button.
- “Clean and Build” Project “OsteoMeter”, by do right click Project “OsteoMeter”, then pressing “Clean and Build”.

Clean and Build Project
- Display after “Clean and Build”.

Display after Clean and Build
- Running Project “OsteoMeter” with click Button (
 ).
).
Running Project OsteoMeter
- Display after Running result of deploy file *.m to *.java on Netbeans without Matlab.

Display after Running .m to .java on Netbean without Matlab
note: if interface display the results of running only appears a few seconds (automatic exit). The solution is on the section “Edit file .java which is Main-Class”. Maybe you are not yet looking for a script “mcr.dispose();” by pressing “CTRL + F” and then type keyword “mcr.dispose();” then change it to “/ /mcr.dispose();” and press save button.
- Congratulations, you’ve been success to Running result of deploy file *.m to *.java on Netbeans without Matlab. 🙂
- To be Continue On [part 5]


Naive Bayes Classifier To Classification Image Of Citrus Fruits With Matlab Code
Again and again we delay publishing “Deploy. M (Matlab) to. Java and. Jar (Java Application) On Windows OS [part 4]” Our precedence with other posts that hope give beneficial for everyone, especially to all students in the world. Peace all. Hehe .. ![]()
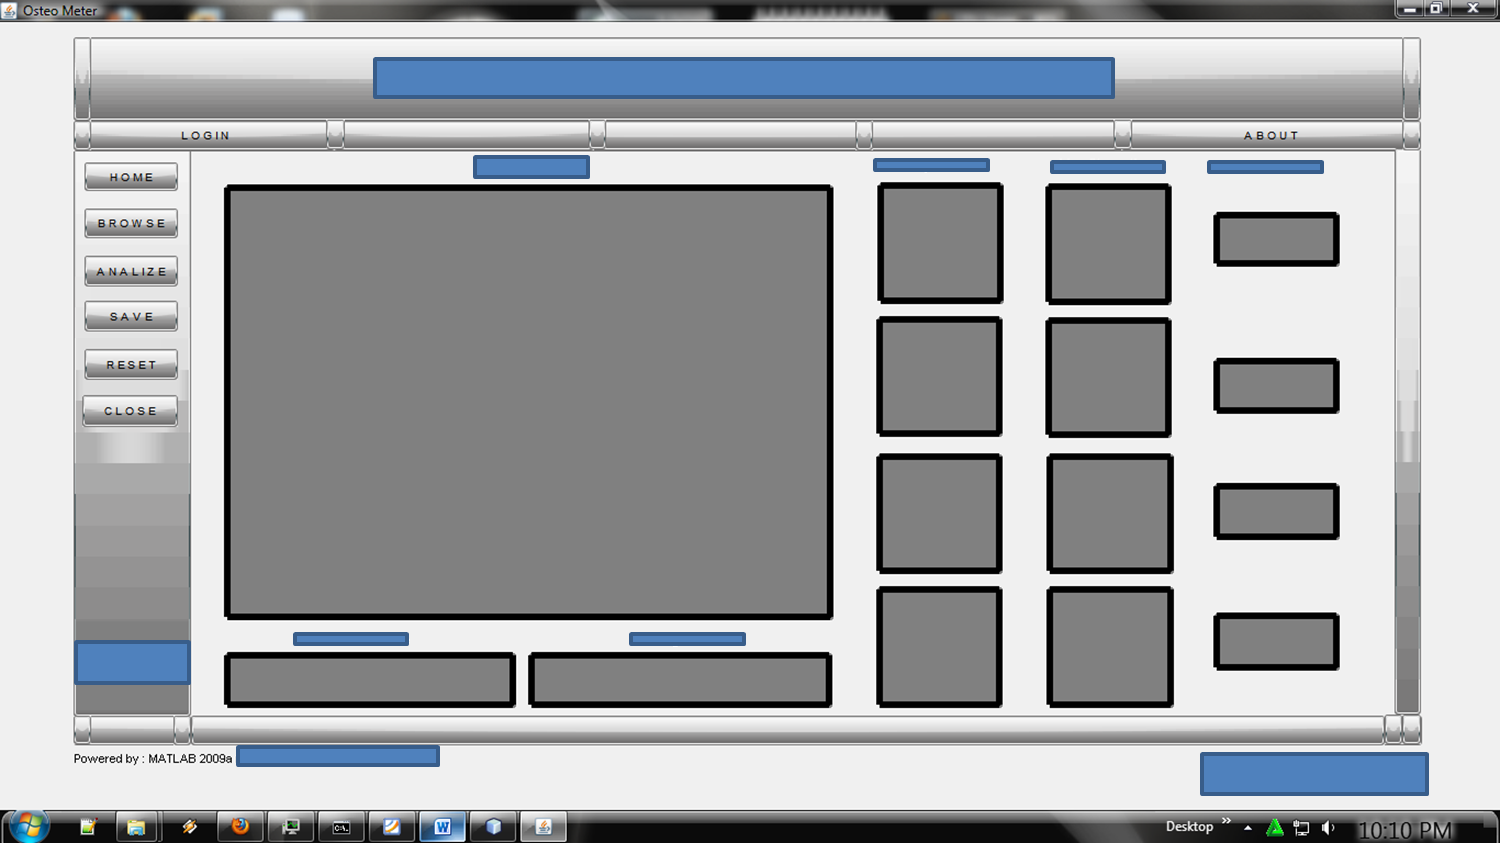
This is our interface/ visualization of program part 1 :
Naive Bayes Classifier On Pattern Recognition_Init_Interface
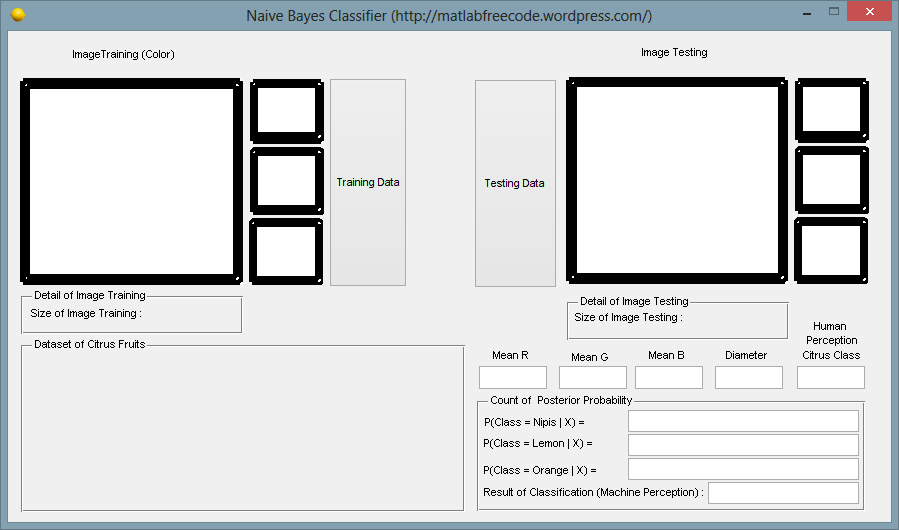
This application was delay several times in between busy work and accompany cousin from Samarinda City to register and prepare the college entrance test (University Of Brawijaya Malang) at 18-19 June 2013, finally on this occasion we think it appropriate and fitting to be able to share knowledge to all people, to the students, academics and the public. Indeed this application considered to be very simple in terms of features, because the features used only rely on the value of the average channel Red, Green, Blue and Horizontal Diameter. And as if the object like requires used must be absolutely has a very prominent difference with other objects. Alright all, here is an example of a simple implementation of Naive Bayes algorithm to classification some citrus fruit (Nipis, Lemon and Orange). Hope you enjoy and success learning of Naive Bayes Classifier to your education, research and other. This is our interface/ visualization of program part 2 (Training Process of Dataset Citrus) :

Naive Bayes Classifier On Pattern Recognition_Training_Process_Is_Done
This is our interface/ visualization of program part 3 (Testing Class Lemon) :

Naive Bayes Classifier On Pattern Recognition_Testing_Process_Lemon_Citrus
This is our interface/ visualization of program part 4 (Testing Class Nipis) :

Naive Bayes Classifier On Pattern Recognition_Testing_Process_Nipis_Citrus
This is our interface/ visualization of program part 5 (Testing Class Orange) :

Naive Bayes Classifier On Pattern Recognition_Testing_Process_Orange_Citrus
You can download This Matlab Code All About “Naive Bayes Classifier To Classification Image Of Citrus Fruits With Matlab Code” at (Matlab_Code_To_Classification_Citrus.zip). Note : “After Download it, To Extract File (Matlab_Code_To_Classification_Citrus.zip), You must Rename Extension *.doc to *.zip” ![]()
To Running the program, double click NaiveBayesClassifier.m file. Enjoy with matlab code, especially for your research.
Any Suggestions, Question and Other, Send to My Email : matlabfreecode@gmail.com
(CMIIW & PMIIW).
Detection Of Vessels In Eye Retina Using Line Tracking Algorithm With Matlab Code
Hello All student and people in the world. Sorry, if we delay our posting about “Deploy .m (Matlab) to .java and .jar (Java Application) On Windows OS [part 4]”. It’s will coming soon, okey. 😀
In this chance, We have been write code to vessel detection in eye retina without using syntax “For or while”. So our code is pure using matrix concept, thus this project can run only -+ 15 second. This is our interface/ visualization of program part 1 :
Detection Of Vessels In Eye Retina Using Line Tracking Algorithm_1
The Theory :
Line Tracking Method used to trace a line on the image with a certain angular orientation and diameter. By utilizing the image histogram, the pixel area boundaries will be determined to be tracked by the threshold value corresponding to the frequency of the intensity image (Vlachos M and Dermatas E, 2010). After getting the tracking area, it will be done early in the initialization process for tracking pixel pixel neighbors with direction and a predetermined diameter. By calculating the value of the weight of each pixel neighbors, it will be selected the pixels that have the greatest weight and the value exceeds a predetermined threshold weight. If it is not eligible, it will be re-initialization process early pixels. If there is one that meets the pixel, the pixel is marked as a line pixel by providing trust value of “1”, while the other pixels set to “0”. Furthermore, this process is repeated until all of the pixel area is completed tracking. This is our interface/ visualization of program part 2 :
Detection Of Vessels In Eye Retina Using Line Tracking Algorithm_2
Best Result Map Quantization Without Masking Image :
Detection Of Vessels In Eye Retina Using Line Tracking Algorithm_3
You can download This Matlab Code All About “Detection Of Vessels In Eye Retina Using Line Tracking Algorithm” at (Source Code To Vessel Detection In Eye Retina.zip). Note : “After Download it, To Extract File (Source Code To Vessel Detection In Eye Retina.zip), You must Rename Extension *.doc to *.zip” ![]()
To Running the program, double click Line.m file. Enjoy with matlab code, especially for your research.
Paper reference (2010):
Multi-scale retinal vessel segmentation using line tracking.
Marios Vlachos, Evangelos Dermatas.
Department of Electrical Engineering and Computer Technology, University of Patras, Patras, Greece
Any Suggestions, Question and Other, Send to My Email : matlabfreecode@gmail.com
(CMIIW & PMIIW).
Deploy .m (Matlab) to .java and .jar (Java Application) On Windows OS [part 3]
In the third section. we will discuss about (Process deploy source code *.m into to .java and *.jar (Java Application)) : Compile Project “MyProject_Java_Application” by clicking “Build the project” Button ( ). Okey, Let’s Go Developer :
- If it appears (mbuild-setup), it means you do deploy for the first time, do the following:
- Click link (mbuild -setup)
- Type “y” without quotes and press “Enter”
- Type “1” without the quotes and press “Enter”
- Type “y” without quotes and press “Enter”
- Type “y” without quotes and press “Enter”
- Type “1”, then press “Enter”. Then type “y”, and press “Enter”
- Do it again Compile Project “MyProject_Standalone_Application” by clicking “Build the project” Button (
 )
) - If appears display like below, it means you’ve done the compiler to deploy configuration settings before. Wait a while until the “Compilation in progress” is completed.

- Display when deployment is completed “Compilation completed” and if there is an error it will appear in red text.
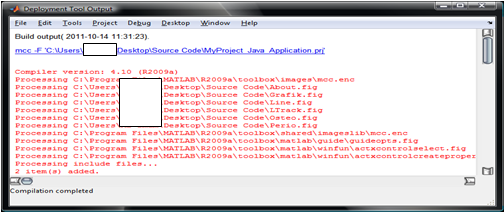 The solution, check whether javac (java component) has been activated on your computer, see part 1. After that, close your MATLAB if still active, then open again your MATLAB. Open file “MyProject_Java_Application.prj” with form “Deployment Tool”. Do it again Compile Project “MyProject_Java_Application” by clicking “Build the project” ().


- If successful, then all the text in the “Deployment Tool Output” black.

- Results are deployed on the folder where the file “MyProject_Java_Application.prj” saved, e.g. on “C:\Users\……\Desktop\Source Code”.

note: folder “…\MyProject_Java_Application” is the same meaning as “C:\Users\……\Desktop\Source Code\ MyProject_Java_Application”.
- Content Folder “…\MyProject_Java_Application” :

- Content Folder : “…\MyProject_Java_Application\distrib” :
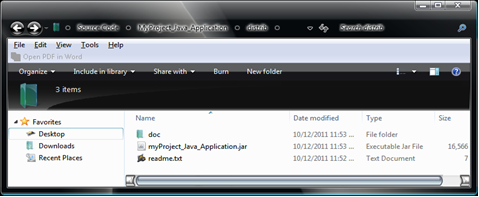 note: the file *. jar in the directory “…\MyProject_Java_Application\distrib” can not be run as independently, so it should run the “Build” process with NetBeans or the “Export” with Eclipse from all files existing java on folder
“…\MyProject_Java_Application\src\myProject_Java_Application”
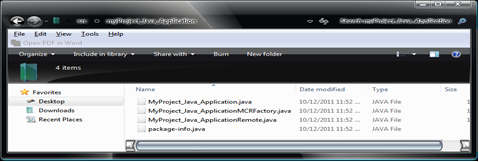
and file. ctf that exist in folder “…\MyProject_Java_Application\src\classes\myProject_Java_Application”. - Content Folder : “…\MyProject_Java_Application\src\myProject_Java_Application” :
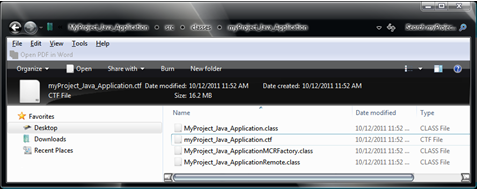
- Content Folder “…\MyProject_Java_Application\src\classes\myProject_Java_Application” :
- Content Folder “…\MyProject_Java_Application” :
- Congratulations, you’ve been success to deploy *.m into *. java and *.jar (Java Application) ! 🙂
- To be Continue On [part 4]
Deploy .m (Matlab) to .java and .jar (Java Application) On Windows OS [part 2]
In this second part, Deploy source code *.m (Matlab) to .java and *.jar (Java Application) on Windows OS include : Run deploytool from the Command Window menu, then press “Enter” Or run deploytool menu from the Start button, and then click on “Deployment Tool (deploytool)”, and deploy process source code *.m to *.java and *.jar (Java Application). Let’s join steps below :
- Run deploytool from the Command Window menu, then press “Enter”.

Run deploytool from the Command Window menu, then press ‘Enter’
- Or, run deploytool menu from the Start button, and then click on “Deployment Tool (deploytool)”.
'")
Or, run deploytool menu from the Start button, and then click on ‘Deployment Tool (deploytool)’
- Form Display Deployment Tool.

Form Display Deployment Tool
- Click File> New Deployment Project Deployment Tool on the menu bar.

Click File-New Deployment Project Deployment Tool on the menu bar
- Deploy process source code *.m to *.java and *.jar (Java Application).
- Rename Project and choose Location File Source Code, then click “OK”.

Rename Project and choose Location File Source Code, then click ‘OK’
- Display Form Compiler

Display Form Compiler
- Include the only one main file *.m of “MyProject_Java_Application” with the click of a button ”
 “, then click the button “Open”.

Include the only one main file
- Results Include file at “MyProject_Java_Application”.

Results Include file at ‘MyProject_Java_Application’
- Include all required files “MyProject_Java_Application” (Osteo.m) in the “Other files” with the click of a button ”
 “, then click the button “Open”.

Include all required files
- Save Project “MyProject_Java_Application” by clicking “save” (
 ).
).
- Rename Project and choose Location File Source Code, then click “OK”.
- To be Continue On [part 3]

'")


Deploy .m (Matlab) to .java and .jar (Java Application) On Windows OS [part 1]
Before doing the Deploy source code *.m Into. Java and. Jar, we first do the following tricks to enable MATLAB JA Builder (Java Application), Recommended minimal use Matlab 2009 :
- Install MCRInstaller.exe
(Take MCRInstaller file in folder :
“C:\Program Files\MATLAB\R2009a\toolbox\compiler\deploy\win32\MCRInstaller.exe”)
MCRInstaller File
note: address MCRInstaller file “C:\Program Files\MATLAB\R2009a\toolbox\compiler\deploy\win32\MCRInstaller.exe” may be different with your computer. Because this MCRInstaller file address matches the address of where we install Matlab. So take this MCRInstaller file as it is on your computer.

- Open cmd windows, and then check whether javac (java component) has been active on your computer with the command “javac-version” (without the quotes). If you have not done, then headed step 3.

java component
- Open “Control Panel \ System and Security \ System” (If you are using Windows 7).

Control Panel Win7
- Click “Advanced system setting”, then click “Advanced” tab,

Advanced system setting


- If you are using Windows XP. Open the “Control Panel”, then click “Performance and Maintenance” and then click “System”, then click the “Advanced” tab.

Performance and Maintenance
- Click the “Environment Variables” button.

Environment Variables
- Find in the “System variables” that Variable named “Path”.

System Variables
- Click the “Edit” button.

Edit button
- Add the following value “;C:\Program Files\Java\jdk1.6.0_16\bin” (without quotation marks) in the Variable value. Then click the “OK” button.

Edit System Variable
note: value “;C:\Program Files\Java\jdk1.6.0_16\bin” could be different with your computer. Because the address of this value corresponds to the version we install jdk. So take this value According to the address you have in your computer.

Javac Location
note: Notice the text on the part that has a gray background color, the entire contents of the Variable value in the computer we have copy-paste it in Notepad ++, hopefully can be used as a reference. (Fill all the Variable value is only 1 line or 1 line only).

All Contents of the Variable Value
- Check javac version. Close cmd if it is still active, we open cmd windows again, then we type the command “javac-version” (without quotes) will display as shown below.

Javac Check Again
- Congratulation, javac (java component) has been active on your computer. 🙂
- To be Continue On [part 2]


Deploy .m (Matlab) to .exe (Standalone Application) On Windows OS [part 4]
In the fourth phase, we will present one of the few techniques that can be use to put icons on the file “*.exe” from results deploy “*.m”. And techniques to hide the console/ command window that appears when we run the file “*.exe”. Consider the steps below :
- Note : Before we explain topic this phase, in this below is types of compiler to deploy *.m to *.exe ;
- LCC compiler (default of matlab).
- MSVC compiler (can be used if you have already installed visual studio).
- Run the file “MyProject_Standalone_Application.exe”, it will be followed by Form Command Windows.

Run the file MyProject_Standalone_Application.exe, it will be followed by Form Command Windows
- Hidden commad window when run the results deploy from *.m to *.exe :
- Install software NSIS (Free), download << here>>. After download, rename extension from *.doc to *.exe. 🙂
- Create a new folder, you must provide contains the following files below :

Folder contains the following files
- Create script file “.nsi” following include icon file name “.ico” certain. (download here -> Osteo Meter.nsi)
Rename name file and extension file *.doc to “Osteo Meter.nsi”
Create script file .nsi
- Right-click the file *.nsi then click “Compile NSIS Script” to compile a “Osteo Meter.exe” watch line 9.

Compile NSIS Script
- Create a file *.ini to call the setting file *.exe” file the results of the deploy from file *.m (Matlab code). The file name *.ini must be the same name as the file name “Osteo Meter.ini” in the script *.nsi at line 13.

Create a file .ini
- Finally, run the file “Osteo Meter.exe”, then Command Window will be hidden.

Run the file Osteo Meter.exe, then Command Window will be hidden
- Finish. 🙂


Deploy .m (Matlab) to .exe (Standalone Application) On Windows OS [part 3]
Okay, now we’ve entered the third section. In this section, we will discuss about (Process deploy source code *.m into *.exe become Standalone Application) : Compile Project “MyProject_Standalone_Application” by clicking “Build the project” Button (). Okey, Let’s Go To Follows This Step below :
- If it appears (mbuild-setup), it means you do deploy for the first time, do the following:

Display mbuild-setup
- Click link (mbuild -setup)

Click Link mbuild-setup
- Type “y” without quotes and press “Enter”

Type ‘y’
- Type “1” without the quotes and press “Enter”

Type ‘1’
- Type “y” without quotes and press “Enter”

Verify Compiler
- Type “y” without quotes and press “Enter”

mbuild locate
- Type “1”, then press “Enter”. Then type “y”, and press “Enter”

Choose Compiler
- Do it again Compile Project “MyProject_Standalone_Application” by clicking “Build the project” Button ()
- If appears display like below, it means you’ve done the compiler to deploy configuration settings before. Wait a while until the “Compilation in progress” is completed.

Compilation in progress
- Display when deployment is completed “Compilation completed” and if there is an error it will appear in red text. If successful, then all the text in the “Deployment Tool Output” black.

Compilation completed
- Results are deployed on the folder where the file “MyProject_Standalone_Application.prj” saved.

MyProject_Standalone_Application.prj saved
- Congratulations, you’ve been success to deploy *.m to *. exe (Windows Application) ! 🙂
- To be Continue On [part 4]


