Blog Archives
Deploy .m (Matlab) to .java and .jar (Java Application) On Windows OS [part 3]
In the third section. we will discuss about (Process deploy source code *.m into to .java and *.jar (Java Application)) : Compile Project “MyProject_Java_Application” by clicking “Build the project” Button ( ). Okey, Let’s Go Developer :
- If it appears (mbuild-setup), it means you do deploy for the first time, do the following:
- Click link (mbuild -setup)
- Type “y” without quotes and press “Enter”
- Type “1” without the quotes and press “Enter”
- Type “y” without quotes and press “Enter”
- Type “y” without quotes and press “Enter”
- Type “1”, then press “Enter”. Then type “y”, and press “Enter”
- Do it again Compile Project “MyProject_Standalone_Application” by clicking “Build the project” Button (
 )
) - If appears display like below, it means you’ve done the compiler to deploy configuration settings before. Wait a while until the “Compilation in progress” is completed.

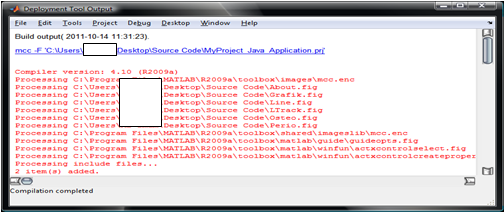
- Display when deployment is completed “Compilation completed” and if there is an error it will appear in red text.
 The solution, check whether javac (java component) has been activated on your computer, see part 1. After that, close your MATLAB if still active, then open again your MATLAB. Open file “MyProject_Java_Application.prj” with form “Deployment Tool”. Do it again Compile Project “MyProject_Java_Application” by clicking “Build the project” ().


- If successful, then all the text in the “Deployment Tool Output” black.

- Results are deployed on the folder where the file “MyProject_Java_Application.prj” saved, e.g. on “C:\Users\……\Desktop\Source Code”.

note: folder “…\MyProject_Java_Application” is the same meaning as “C:\Users\……\Desktop\Source Code\ MyProject_Java_Application”.
- Content Folder “…\MyProject_Java_Application” :

- Content Folder : “…\MyProject_Java_Application\distrib” :
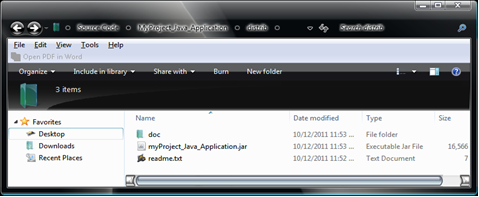 note: the file *. jar in the directory “…\MyProject_Java_Application\distrib” can not be run as independently, so it should run the “Build” process with NetBeans or the “Export” with Eclipse from all files existing java on folder
“…\MyProject_Java_Application\src\myProject_Java_Application”
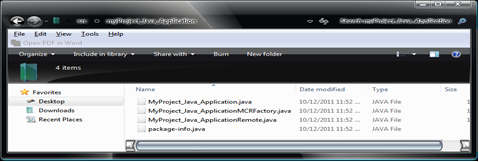
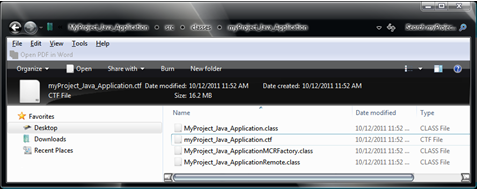
and file. ctf that exist in folder “…\MyProject_Java_Application\src\classes\myProject_Java_Application”. - Content Folder : “…\MyProject_Java_Application\src\myProject_Java_Application” :
- Content Folder “…\MyProject_Java_Application\src\classes\myProject_Java_Application” :
- Content Folder “…\MyProject_Java_Application” :
- Congratulations, you’ve been success to deploy *.m into *. java and *.jar (Java Application) ! 🙂
- To be Continue On [part 4]
Deploy .m (Matlab) to .java and .jar (Java Application) On Windows OS [part 1]
Before doing the Deploy source code *.m Into. Java and. Jar, we first do the following tricks to enable MATLAB JA Builder (Java Application), Recommended minimal use Matlab 2009 :
- Install MCRInstaller.exe
(Take MCRInstaller file in folder :
“C:\Program Files\MATLAB\R2009a\toolbox\compiler\deploy\win32\MCRInstaller.exe”)
MCRInstaller File
note: address MCRInstaller file “C:\Program Files\MATLAB\R2009a\toolbox\compiler\deploy\win32\MCRInstaller.exe” may be different with your computer. Because this MCRInstaller file address matches the address of where we install Matlab. So take this MCRInstaller file as it is on your computer.

- Open cmd windows, and then check whether javac (java component) has been active on your computer with the command “javac-version” (without the quotes). If you have not done, then headed step 3.

java component
- Open “Control Panel \ System and Security \ System” (If you are using Windows 7).

Control Panel Win7
- Click “Advanced system setting”, then click “Advanced” tab,

Advanced system setting


- If you are using Windows XP. Open the “Control Panel”, then click “Performance and Maintenance” and then click “System”, then click the “Advanced” tab.

Performance and Maintenance
- Click the “Environment Variables” button.

Environment Variables
- Find in the “System variables” that Variable named “Path”.

System Variables
- Click the “Edit” button.

Edit button
- Add the following value “;C:\Program Files\Java\jdk1.6.0_16\bin” (without quotation marks) in the Variable value. Then click the “OK” button.

Edit System Variable
note: value “;C:\Program Files\Java\jdk1.6.0_16\bin” could be different with your computer. Because the address of this value corresponds to the version we install jdk. So take this value According to the address you have in your computer.

Javac Location
note: Notice the text on the part that has a gray background color, the entire contents of the Variable value in the computer we have copy-paste it in Notepad ++, hopefully can be used as a reference. (Fill all the Variable value is only 1 line or 1 line only).

All Contents of the Variable Value
- Check javac version. Close cmd if it is still active, we open cmd windows again, then we type the command “javac-version” (without quotes) will display as shown below.

Javac Check Again
- Congratulation, javac (java component) has been active on your computer. 🙂
- To be Continue On [part 2]


