Blog Archives
Deploy .m (Matlab) to .java and .jar (Java Application) On Windows OS [part 5]
In the fifth section coincides with 5 till 7 day before Eid and holiday period at home in my village until the 11th of August 2013 to connect silaturrahmi / kinship relations and longs to be with both parents and my siblings. Alhamdulillah, I feel very happy and peaceful can be meeting them. This seems similar to the story when I heard the song of “Michael Bublé – Let me go home”. hehe .. 🙂 , Okey all student and people in the world, now we will share how to run the file from the deploy results *.m to *.java using Eclipse (How to run all files *. Java in the folder “..\MyProject_Java_Application\src\myProject_Java_Application” and file *.ctf in folder “..\MyProject_Java_Application\src\classes\myProject_Java_Application” in Eclipse). We use Eclipse Indigo & Matlab 2009 and hope you can develop to recently version on both. 🙂 Let’s go the developer :
- Installs Eclipse, then run on your computer.

Installs Eclipse
- Set “Workspace” on the folder that we want. Then click “OK” button.

workspace-folder
- Display “Welcome” page in Eclipse.

Welcome page in Eclipse
- Click “File” and then click “New”, then click “Java Project”.

Click File and then click New then click Java Project
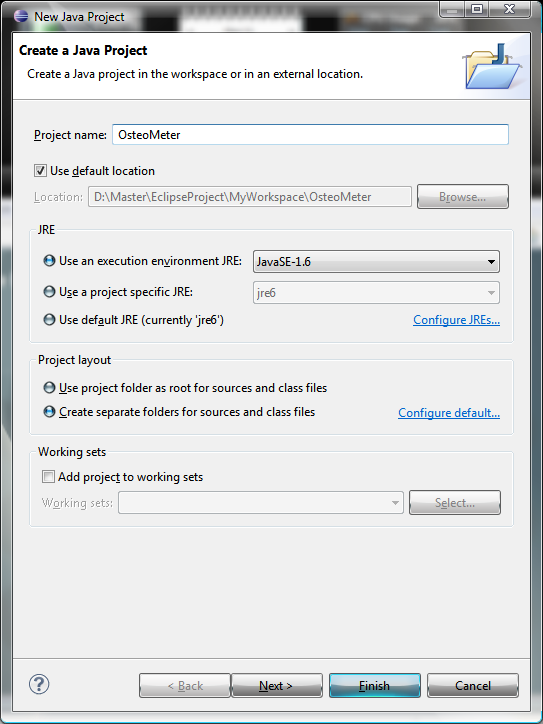
- Create a new project, for example with the name “OsteoMeter”, then click the “Finish” button.

Create a new project for example with the name OsteoMeter then click the Finish button
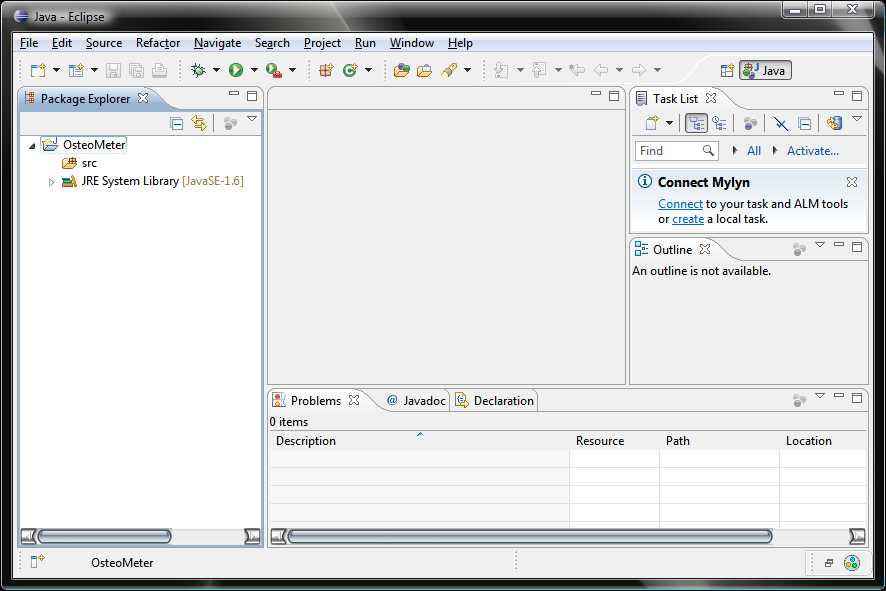
- Click the “Minimize” button on the “Welcome” page to see the Eclipse Project form of “OsteoMeter”.

Click the Minimize button on the Welcome page to see the Eclipse Project form of OsteoMeter
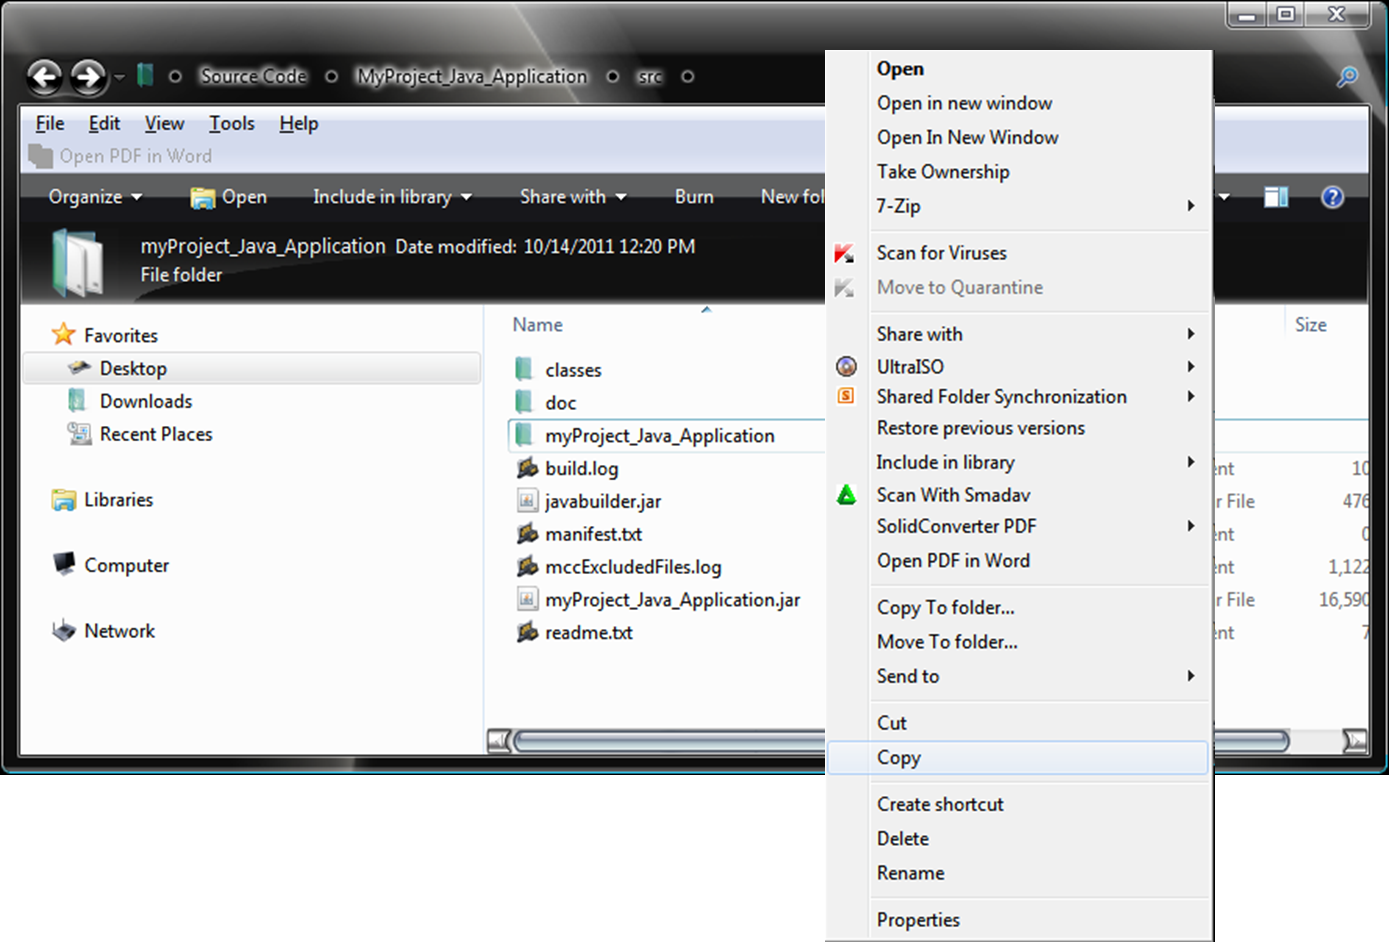
- Copy Folder “myProject_Java_Application” in folder “.. \ MyProject_Java_Application \ src”
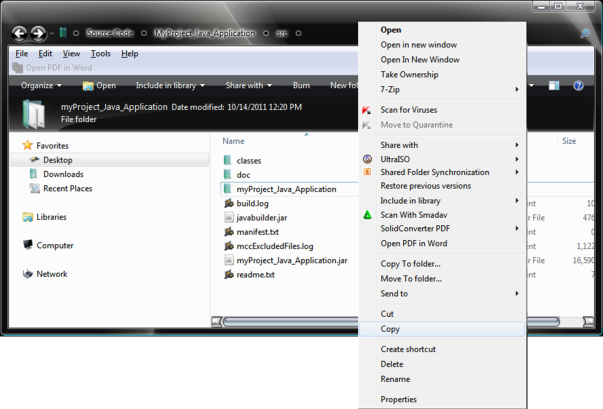
Copy Folder-myProject_Java_Application-in folder -MyProject_Java_Application-src
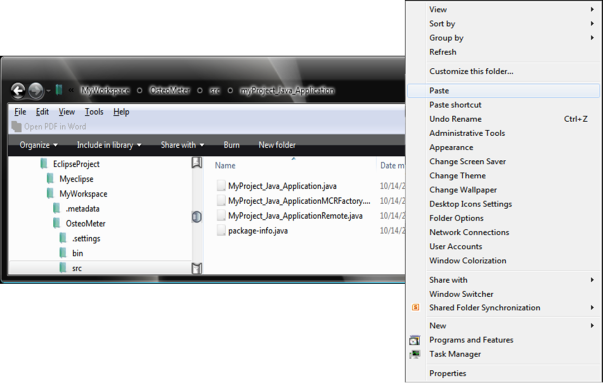
- Then Paste in the folder where we store the Eclipse Project “OsteoMeter”. For example in the folder “D: \ Master \ EclipseProject \ MyWorkspace \, then look for the folder” D: \ Master \ EclipseProject \ MyWorkspace \ OsteoMeter \ src “.

Then paste in folder-eclipse
- Display after the process of Paste is done.

Display after the process of Paste is done – eclipse
- Copy the file *. ctf in the folder “.. \ MyProject_Java_Application \ src \ classes \ myProject_Java_Application”
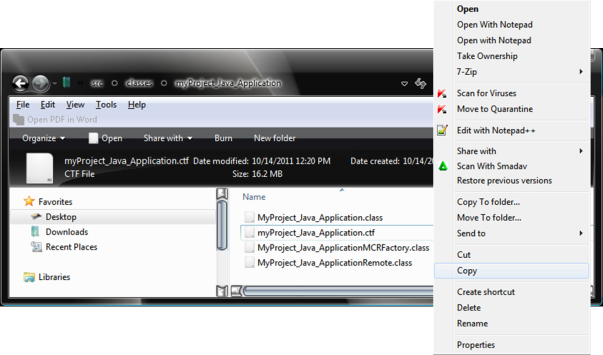
Copy the file-ctf in the folder-MyProject_Java_Application-src-classes-myProject_Java_Application
- Paste it in the folder “D: \ Master \ EclipseProject \ MyWorkspace \ OsteoMeter \ src \ myProject_Java_Application”.
Paste it in the folder-D-Master-EclipseProject-MyWorkspace-OsteoMeter-src-myProject_Java_Application
- Display after the process of Paste is done.

Display after the process of Paste is done-eclipse-part2
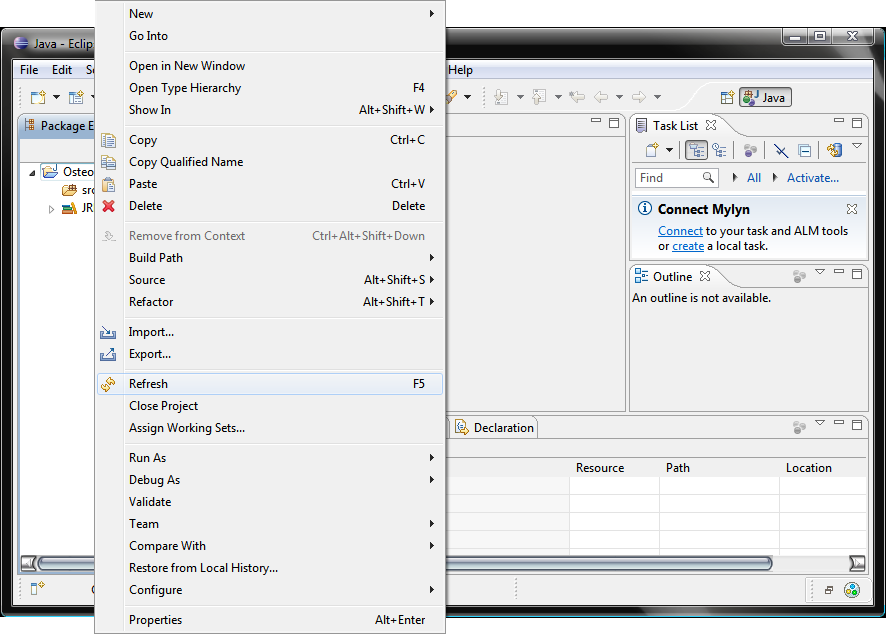
- Back to the Eclipse Project, right click on the Project “OsteoMeter”, then click “Refresh”.
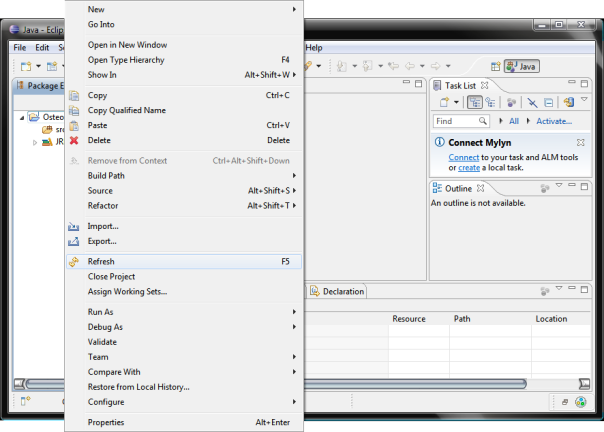
Back to the Eclipse Project-right click on the Project-OsteoMeter-then click-Refresh
- It will show all files “.java” and “.ctf” which has been incorporated and there is appear error.
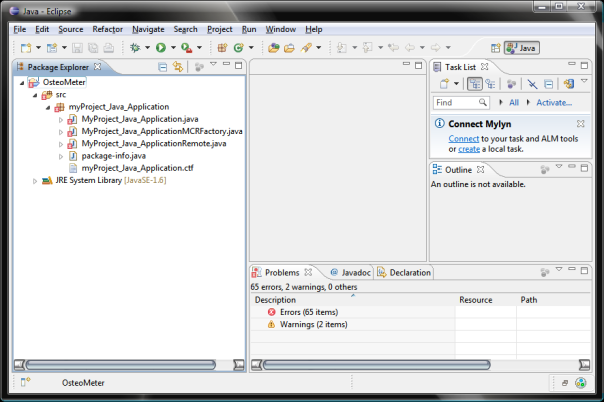
It will show all files java and ctf which has been incorporated and there is appear error
- Enter the library “javabuilder.jar” to eliminate the errors that are marked with red color on some files “.java” in the Eclipse Project.
- Right-click the Project “OsteoMeter”, then click “Build Path”, then click “Configure Build Path …”, then select the “Libraries” tab.

Right-click the Project OsteoMeter then click Build Path then click Configure Build Path then select the Libraries tab
- Click “Add External JARs…” button.

Click Add External JARs button
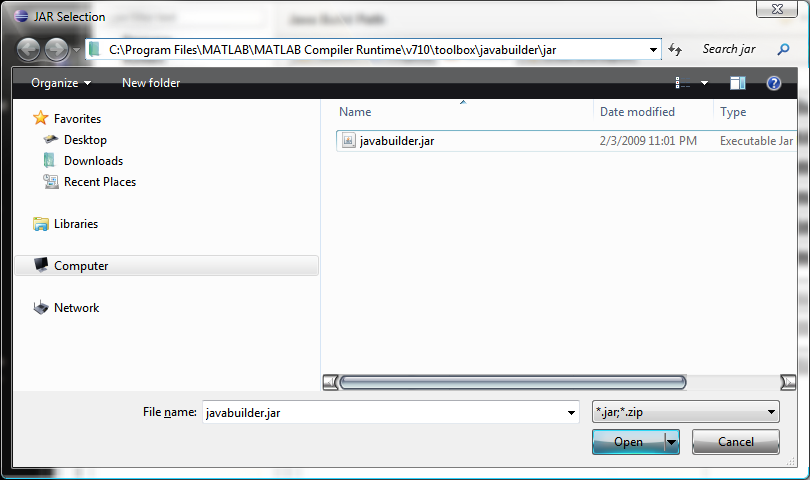
- Select the file “javabuilder.jar” then click “Open”.

Select the file javabuilder.jar then click Open – eclipse
- Click the “OK” button.
note : take library “javabuilder.jar” at “C:\Program Files\MATLAB\MATLAB Compiler Runtime\v710\toolbox\javabuilder\jar\javabuilder.jar”. this directory of javabuilder may be different from those in your computer. Because this directory of javabuilder accordance with the directory where we install file “MCRInstaller.exe”. So take this file javabuilder corresponds to that of in your computer.
- Right-click the Project “OsteoMeter”, then click “Build Path”, then click “Configure Build Path …”, then select the “Libraries” tab.
- Display Project File “OsteoMeter” which has been equipped library “javabuilder.jar”.
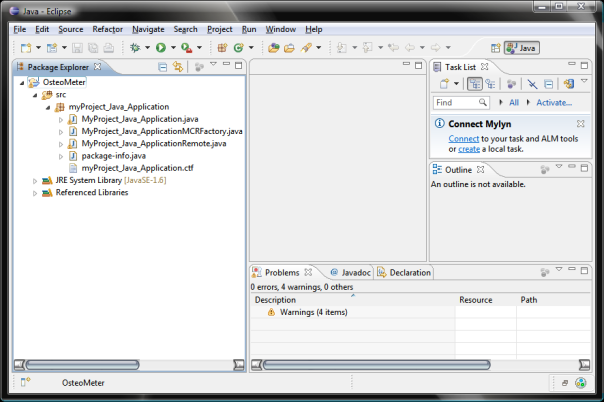
Display Project File OsteoMeter which has been equipped library javabuilder.jar
- Set “MyProject_Java_Application.java” as the Main-Class Project by right clicking “OsteoMeter”, then click “Run As”, then click “Run Configuration ..”.

Set MyProject_Java_Application.java as the Main-Class Project by right clicking OsteoMeter then click Run As then click Run Configuration
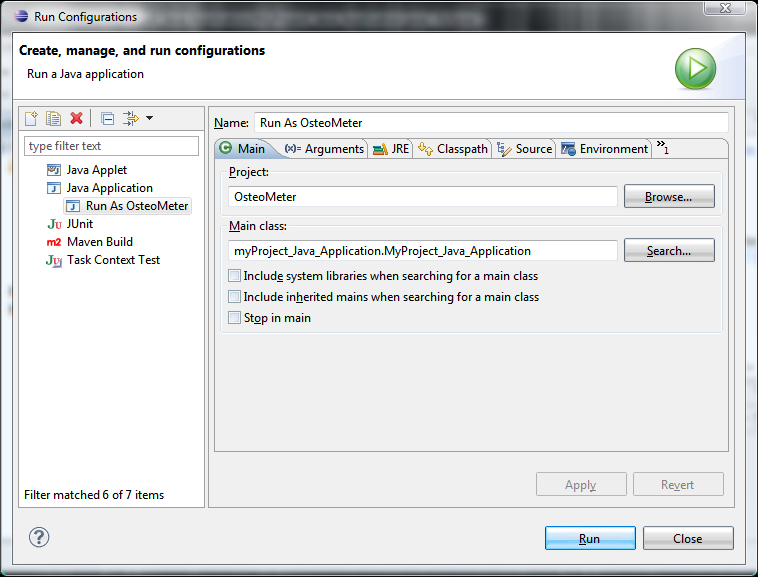
- Click the “Java Application”, then click the “New launch configuration” (
 ), eg “Name: Run As OsteoMeter”. Select Project by clicking the “Browse …”, eg “Project: OsteoMeter”, then click the “Search” in the “Main class:”.

New launch configuration – eclipse
- Select “MyProject_Java_Application” as the Main-Class, then click “OK”.

Select MyProject_Java_Application as the Main-Class then click OK
- Click the “Apply”, then click “Run”. Wait a few moments until the interface is appear, and it close automatically.

Click the Apply then click Run Wait a few moments until the interface is appear and it close automatically
- Click the “Java Application”, then click the “New launch configuration” (
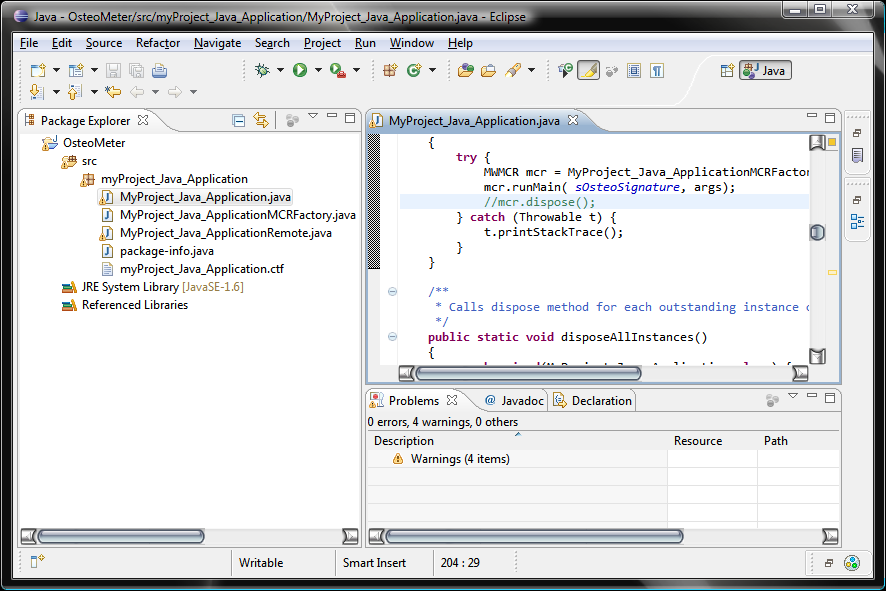
- Edit the file .java which is a Main-Class, the “MyProject_Java_Application.java”

Edit the file .java which is a Main-Class the MyProject_Java_Application.java – eclipse
Seek script “mcr.dispose();” by pressing the button “CTRL+F” then type with keyword “mcr.dispose();” then change become “//mcr.dispose();” then pressing save button.
- Project running process “OsteoMeter” doing by right-clicking Project “OsteoMeter”, then click “Run As”, then click (
 ).
).

process – run as java application – eclipse
- Select “MyProject_Java_Application”, then click “OK”.

Select MyProject_Java_Application then click OK
- The project “OsteoMeter” can be running with other way, by click the black arrow button that down direction.
 Then click “(
 )” that has been set as caller Main-Class in the previous section, so that the Form “Select Java Application” is used to select the file .java with manually way. It’s a Main-Class (file. java that first executed while running the process) doesn’t show up again.
 - Project “OsteoMeter” is being compiled. Wait a few seconds until the interfaces is appear.
Project OsteoMeter is being compiled Wait a few seconds until the interfaces is appear
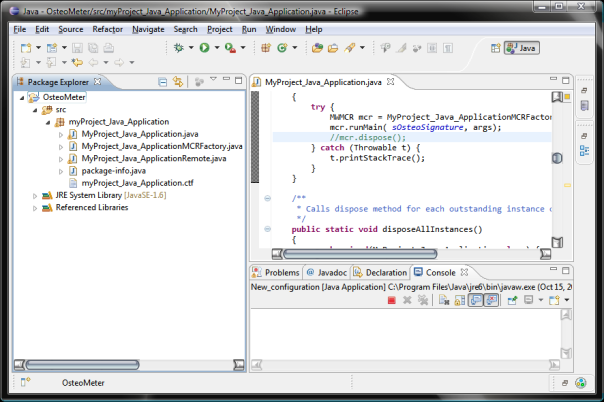
- Display after Running result of deploy file *.m to *.java on Eclipse without Matlab.

Display after Running result of deploy file .m to .java on Eclipse without Matlab
note: if interface display the results of running only appears a few seconds (automatic exit). The solution is on the section “Edit file .java which is Main-Class”. Maybe you are not yet looking for a script “mcr.dispose();” by pressing “CTRL + F” and then type keyword “mcr.dispose();” then change it to “/ /mcr.dispose();” and press save button.
- Congratulations, you’ve been success to Running result of deploy file *.m to *.java on Eclipse without Matlab.
- Finish. 🙂


Deploy .m (Matlab) to .java and .jar (Java Application) On Windows OS [part 4]
In the fourth section coincides with the month of Ramadan, we will share how to run the file from the deploy results *.m to *.java using Netbeans (How to run all files *. Java in the folder “..\MyProject_Java_Application\src\myProject_Java_Application” and file *.ctf in folder “..\MyProject_Java_Application\src\classes\myProject_Java_Application” in NetBeans). We use Netbeans IDE 7.0.1 & Matlab 2009 and hope you can develop to recently version on both. 🙂 Okey, Let’s go the developer :
- Installs Netbeans, then run on your computer.

Installs Netbean
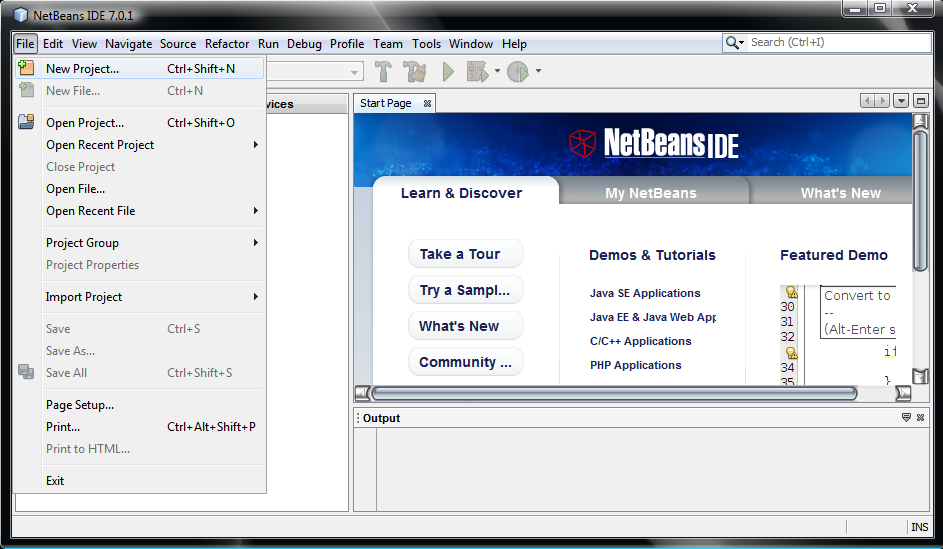
- Click “File”, then Click “New Project…”

Create New Project
- Choose “Categories” [Java] and “Projects” [Java Application], then click “ Next > ” button

Choose Categories
- Create new Project e.g. with name “OsteoMeter”, uncheck at “Create Main Class” and “Set as Main Project”, then click “Finish” button.

Project Name
- Copy Folder “myProject_Java_Application“ into Folder “..\MyProject_Java_Application\src”

Copy Folder myProject_Java_Application
- Then Paste into Folder where we save Project of NetBeans “OsteoMeter”. E.g at folder “D:\Master\NetBeansProject\”, so then seek folder “D:\Master\NetBeansProject \OsteoMeter\src”.

Paste at Folder where we save Project of NetBeans
- Display after Paste folder process is done.

Display after Paste process is done
- Copy file *.ctf at Folder “..\MyProject_Java_Application\src\classes\myProject_Java_Application”

Copy file .ctf at Folder
- Paste into Folder “D:\Master\NetBeansProject\OsteoMeter\src\myProject_Java_Application”.

Paste into Folder D_Master_NetBeansProject_OsteoMeter_src_myProject_Java_Application
- Display after Paste file *.ctf process is done.
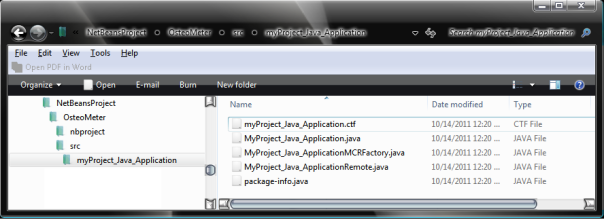
Display after Paste file .ctf process is done
- Back to NetBeans Project, display when all file “.java” and “.ctf” has been included. It’s will be seen there is an error.

Back to NetBeans Project
- Include library “javabuilder.jar” to eliminate errors marked in red on some files of “*.java” :
- Right click “Libraries”

Right click Libraries
- Click “JAR/Folder…”
Click JAR_Folder
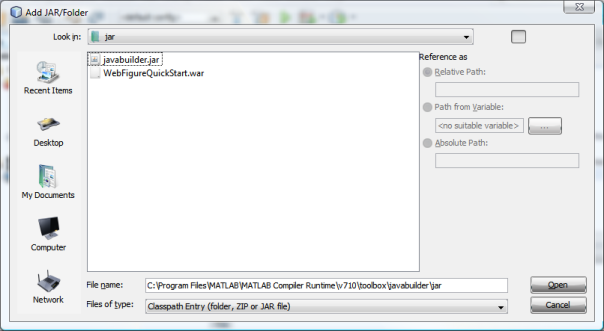
- Choose file “javabuilder.jar” then click “Open” button.
note : take library “javabuilder.jar” at “C:\Program Files\MATLAB\MATLAB Compiler Runtime\v710\toolbox\javabuilder\jar\javabuilder.jar”. this directory of javabuilder may be different from those in your computer. Because this directory of javabuilder accordance with the directory where we install file “MCRInstaller.exe”. So take this file javabuilder corresponds to that of in your computer.
- Right click “Libraries”
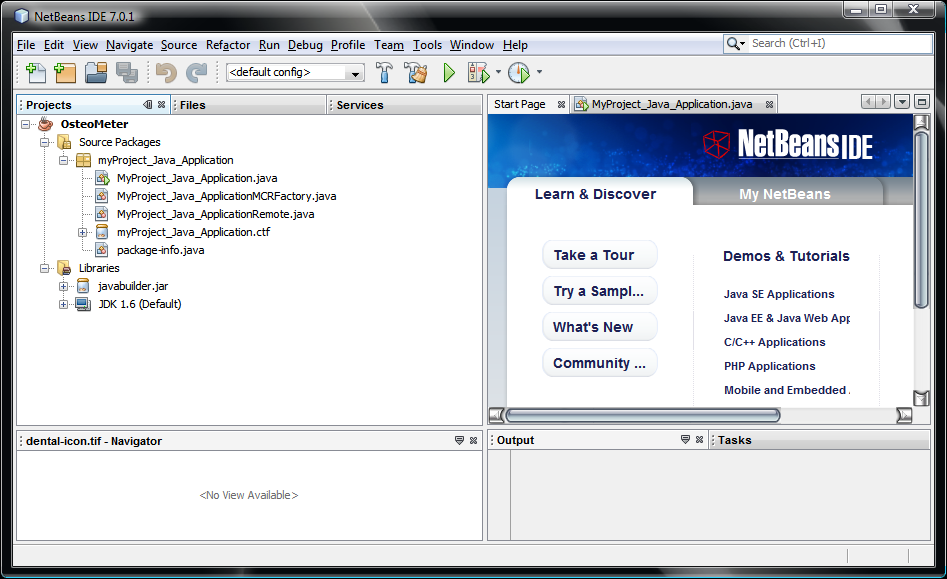
- Display File Project “OsteoMeter” that has been included library of “javabuilder.jar”.

Display File Project OsteoMeter
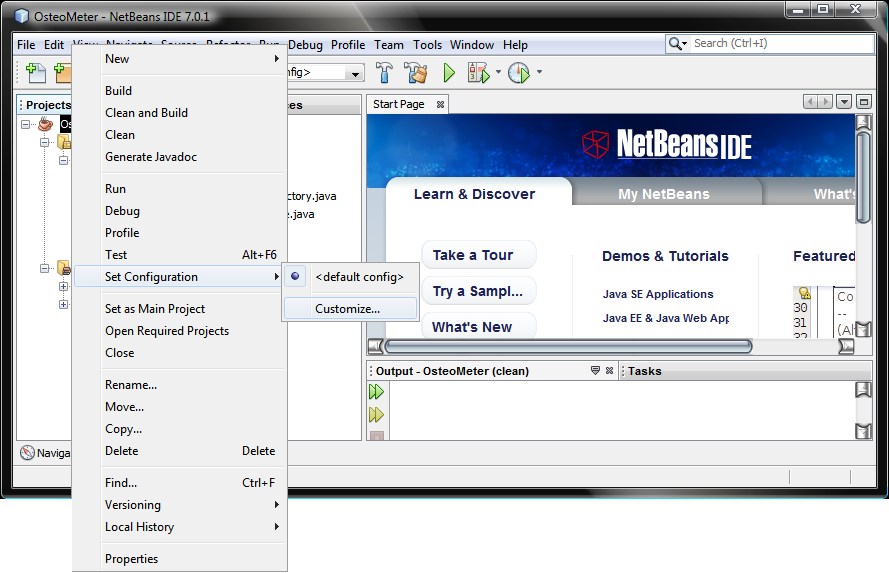
- Set “MyProject_Java_Application.java” as Main-Class, with do right click Project “OsteoMeter”, then select “Set Configuration”, then select “Customize…”

Set MyProject_Java_Application.java as Main-Class
- Click “Browse..” button at field “Main Class”. Then click “Select Main Class” button.

Click Browse.. button at field Main Class
- Then click “OK” button.
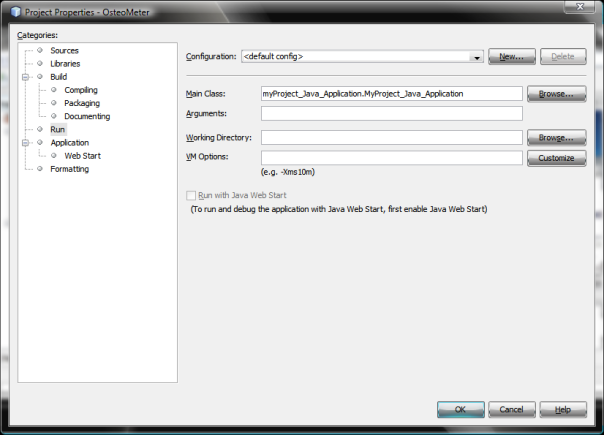
Then click OK button
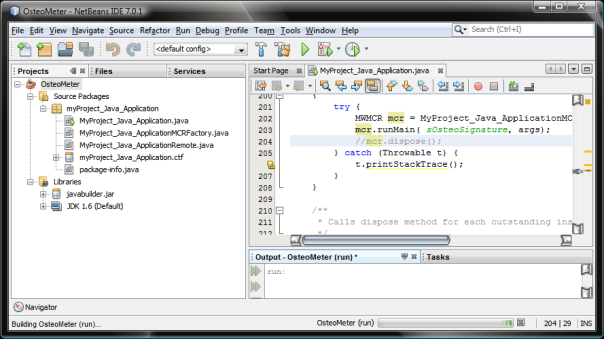
- Edit file .java which is Main-Class, namely “MyProject_Java_Application.java”

Edit file .java which is Main-Class
Seek script “mcr.dispose();” by pressing the button “CTRL+F” then type with keyword “mcr.dispose();” then change become “//mcr.dispose();” then pressing save button.
- “Clean and Build” Project “OsteoMeter”, by do right click Project “OsteoMeter”, then pressing “Clean and Build”.

Clean and Build Project
- Display after “Clean and Build”.

Display after Clean and Build
- Running Project “OsteoMeter” with click Button (
 ).
).
Running Project OsteoMeter
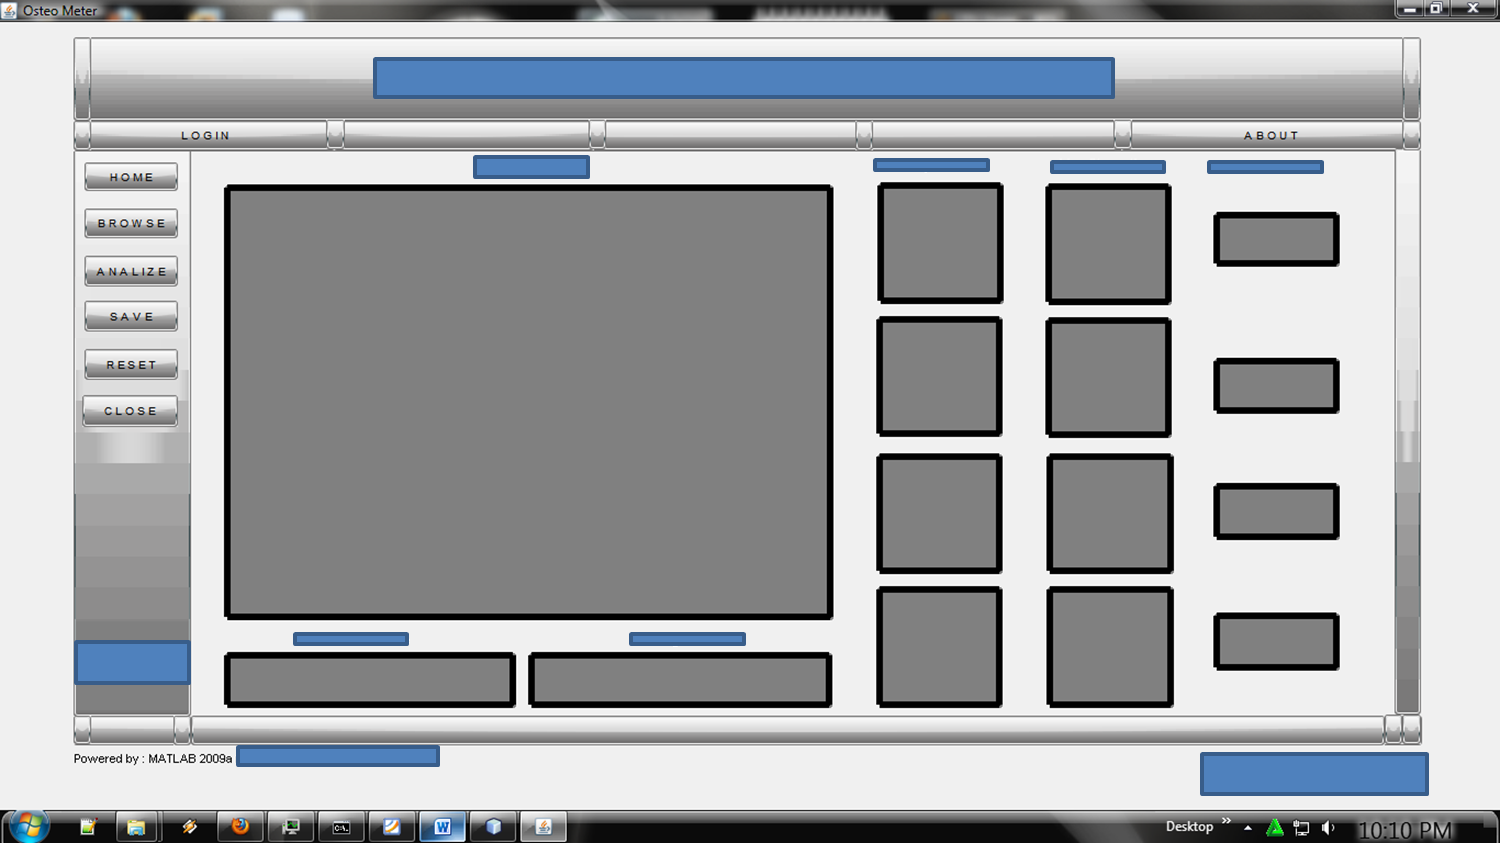
- Display after Running result of deploy file *.m to *.java on Netbeans without Matlab.

Display after Running .m to .java on Netbean without Matlab
note: if interface display the results of running only appears a few seconds (automatic exit). The solution is on the section “Edit file .java which is Main-Class”. Maybe you are not yet looking for a script “mcr.dispose();” by pressing “CTRL + F” and then type keyword “mcr.dispose();” then change it to “/ /mcr.dispose();” and press save button.
- Congratulations, you’ve been success to Running result of deploy file *.m to *.java on Netbeans without Matlab. 🙂
- To be Continue On [part 5]


Deploy .m (Matlab) to .exe (Standalone Application) On Windows OS [part 2]
In the second part, we will discuss about (Process deploy source code *.m into *.exe become Standalone Application) : Rename Project and select the Location File Source Code, Include one of the main file *.m on the “Main Function”, Include all the required files “Main Function” in the “Other files”, Save Project. Okey, Let’s Go To Follows This Step below :
- Rename Project and choose Location File Source Code, then click “OK”

Rename Project and choose Location File Source Code
- Display Form Compiler

Display Form Compiler
- Include one of the main file *.m on the “Main Function”, with click “
 “, then click “Open” button

File .m Main Function
- Result Include file On “Main Function”

Result Include File .m On Main Function
- Include all the required files “Main Function” On the “Other files”, with click ““, then click “Open” button

Include all the required files Main Function On Other files
- Save Project “MyProject_Standalone_Application” with click “Save” (
 ) button

Save Project – MyProject_Standalone_Application
- To be Continue On [part 3]


Deploy .m (Matlab) to .exe (Standalone Application) On Windows OS [part 1]
In each coding that we make, most of us have always wanted an application that can run independently and are not bound by the compiler used. Therefore, in this occasion we do the bookkeeping of how to perform the process steps of the deployment or convert *.m to *.exe in Matlab Programming with the Windows operating system. You can also do this conversion in the other operating systems, such as Mac OS X and Linux. Because MATLAB can be run on its own to support multi-platform. One of the things that makes us like MATLAB. Okey, please follow the steps below (Recommended minimal use Matlab 2009) :
- Run deploytool menu from the Command Window, then press “Enter”.


- Or run the deploytool menu from the Start button, then click “Deployment Tool (deploytool)”.

Open Deploytool Menu from Start

- Display Form Deployment Tool

Form Deployment Tool
- Click File > New Deployment Project On menu bar Deployment Tool.

New Deployment Project
- MATLAB Compiler for deploy source code .m to .exe or .c
- MATLAB Builder EX for deploy source code .m to Excel Add-Ins
- MATLAB Builder NE for deploy source code .m to dot net component .dll
- MATLAB Builder JA for deploy source code .m to .java and .jar
- To be Continue On [part 2]


